How to Activate Your EPLAN Schematic Solution License
After purchasing one or more EPLAN Schematic Solution licenses, you will receive an email with the license keys. These represent your digital licenses, and can be activated directly in your MyFesto account.
Activate Your EPLAN Schematic Solution License
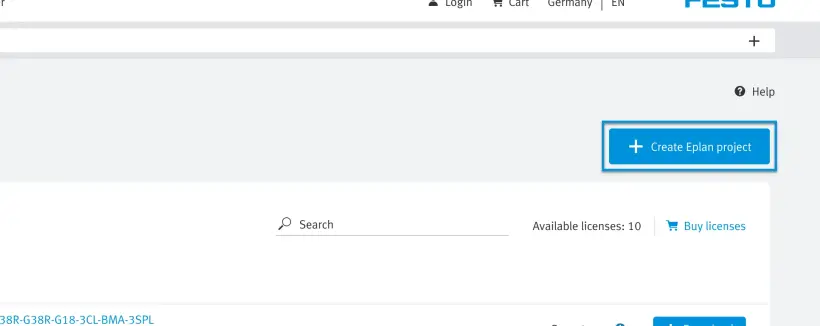
1. Create an EPLAN Schematic Solution project
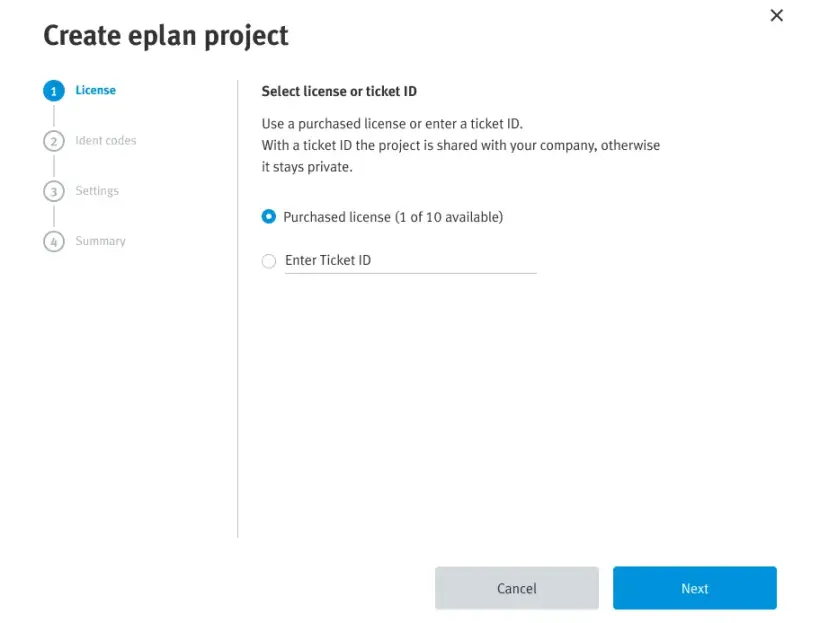
2.1 Either use your existing licenses, which are connected to your account
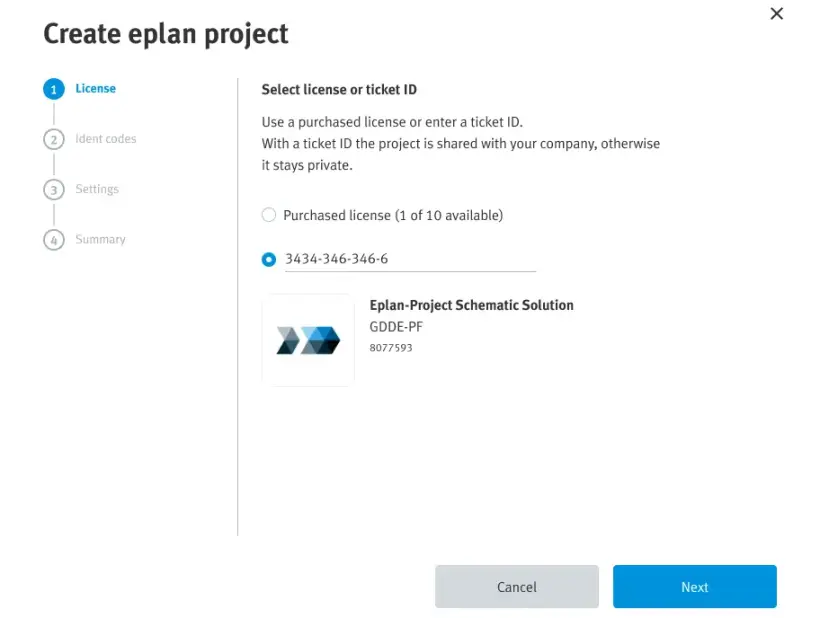
2.2 Or enter the license key from the email you received
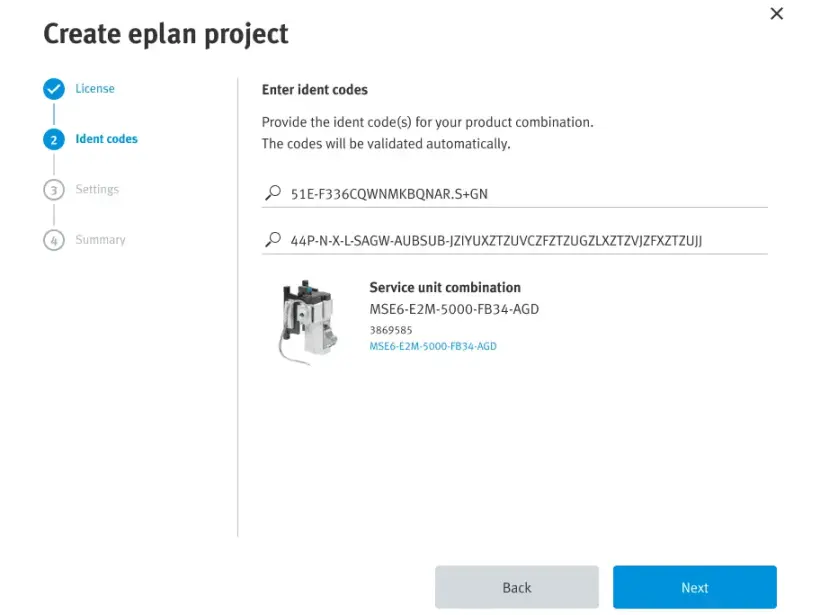
3. Enter the ident code of the product combination
4. Choose the language and version
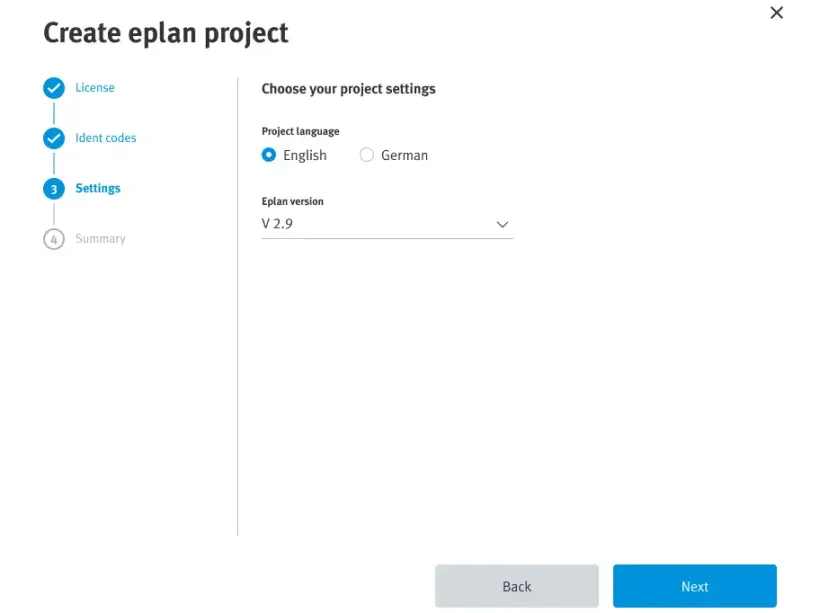
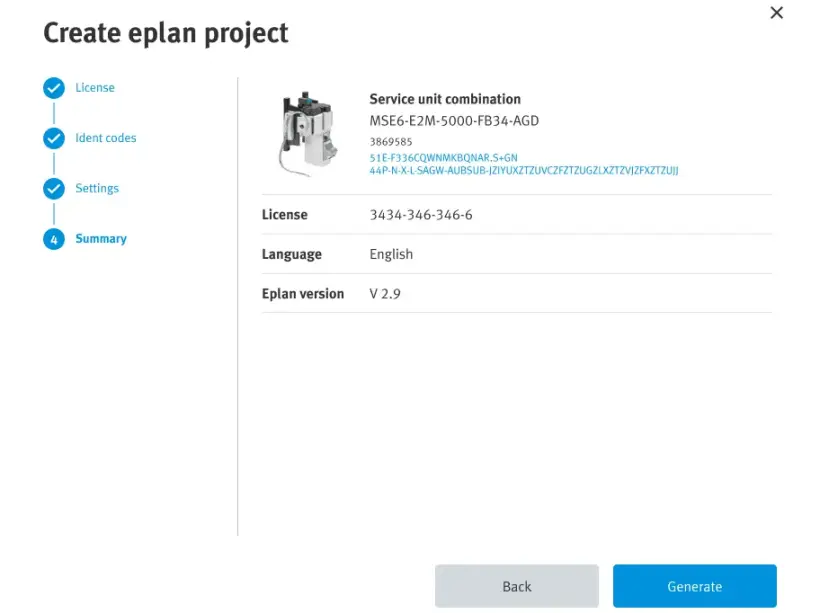
5. Validate the summary of your EPLAN Schematic Solution project
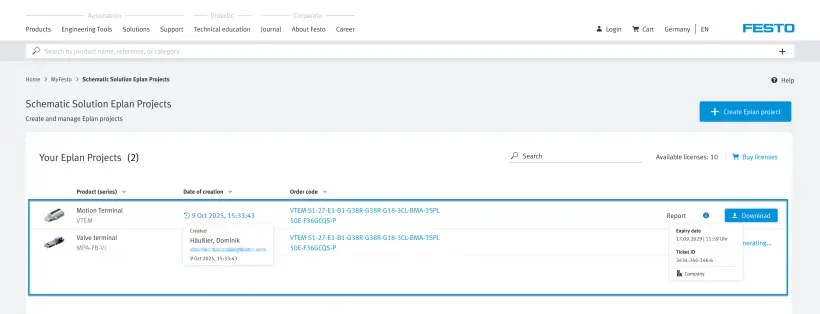
6. Select and download your project
How to activate your Festo LX License
This guide will walk you step by step through the first stages on Festo LX. This can be to create your account, activate a license, or to familiarize yourself with the most important functionalities.
For more detailed information, we recommend you have a look at our How it Works-courses later.
We have 2 courses available:
Create an Account on Festo LX
1. Go to
2. Manage the Cookie Policy
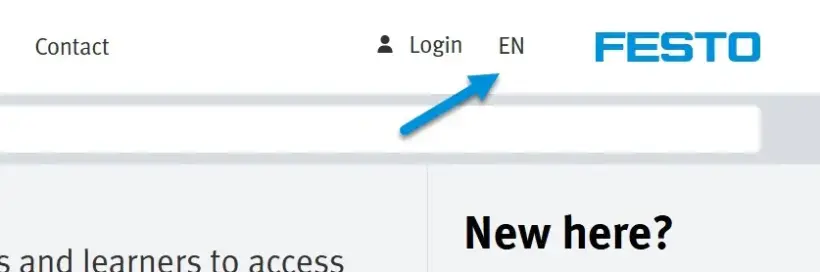
3. If necessary, change the language of the Festo LX portal as it will be the basis for the next steps
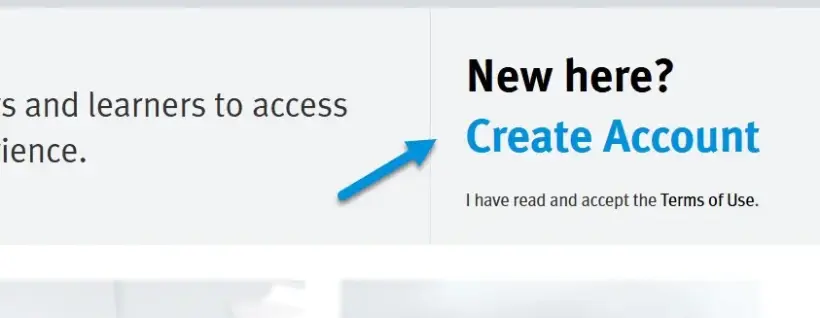
4. Click on "Create Account" in the top right-hand corner
If you already have an account for any other Festo application, software or website, you can also use this account for Festo LX.
If you have purchased our Single Sign-On option, you can use your email address without needing to create a new account.
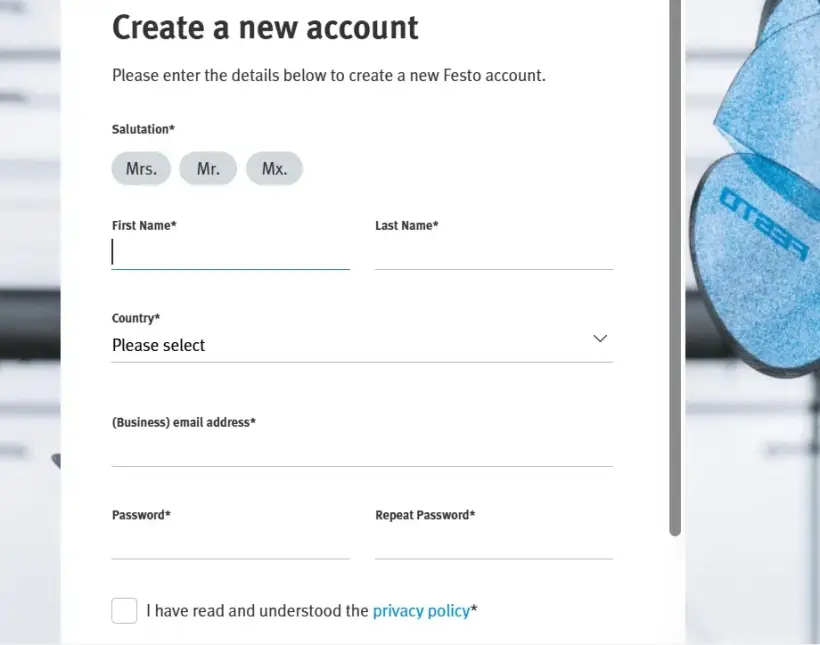
5. Enter all necessary information to create your account
6. Once you have registered, you will receive an email so you can finish setting up your account. If you haven’t received it, please check your spam filter
7. Use your credentials to log in to Festo LX
Activate Your Festo LX License
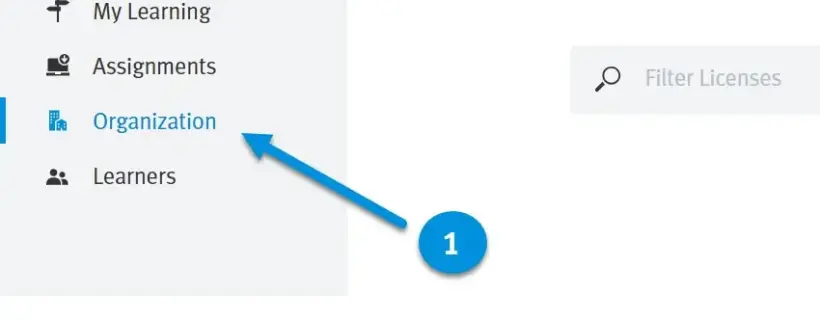
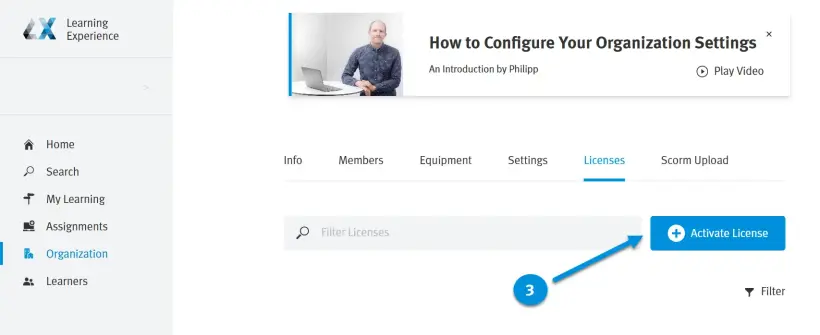
1. Click on "Organization" in the main menu
2. Navigate to the "Licenses" tab
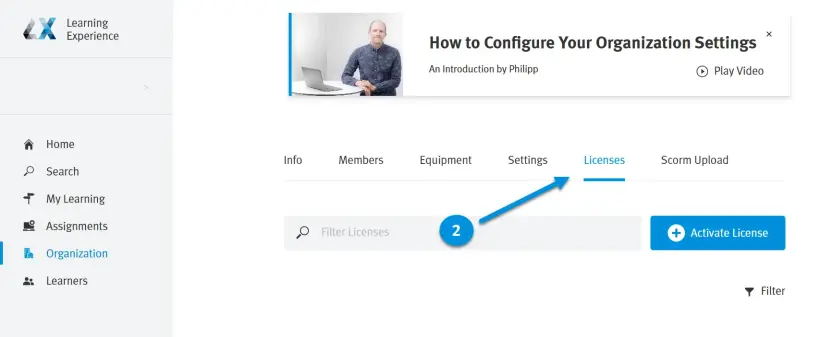
3. Click "Activate License"
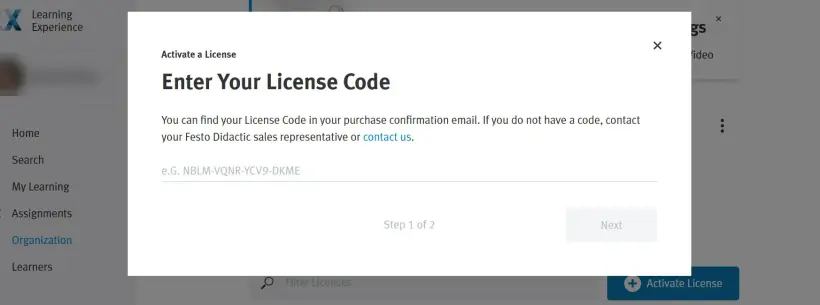
4. Enter your license code and click on "Next" to proceed
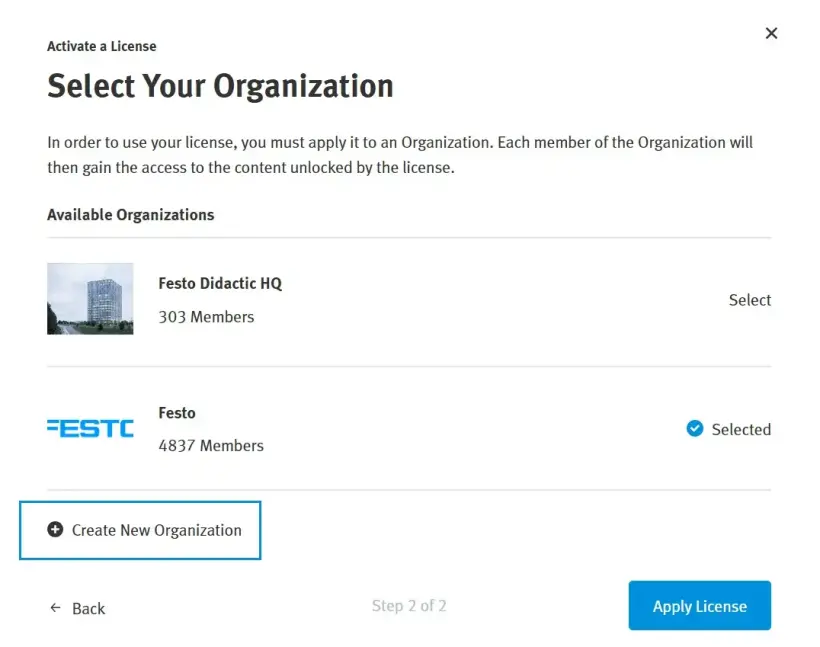
5. Click on "New Organization"
If you already have an organization in Festo LX, you can also activate your license in an existing organization, e.g., to renew a license.
If you have been invited into a Festo LX organization by Festo as part of a demo, please create a new organization for yourself.
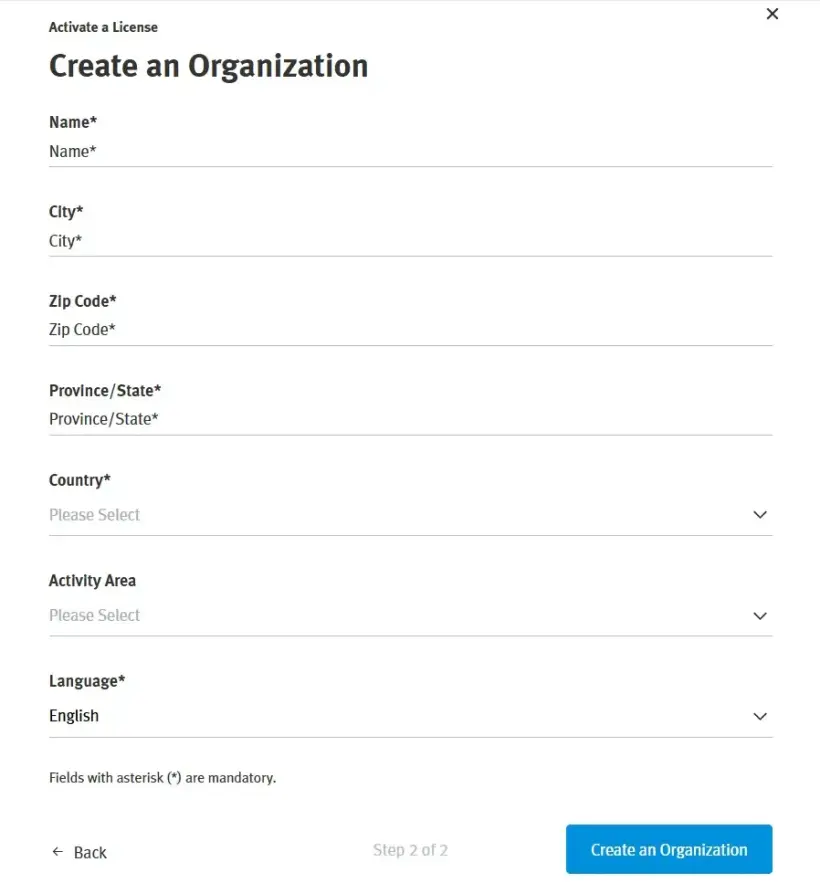
6. Enter the information for your organization when creating a new organization
Information on Licenses
This page will give you an overview of all available licenses in your Festo LX organization. This includes the license duration and available users.
These licenses can be related to Festo LX, but also to other products that are integrated in Festo LX. This can be, for example, FluidSIM 365 or BMC SIM.
You can access more information on the license by clicking on the three dots (under “More”).
How to Activate Your FluidDraw License
After purchasing one or more FluidDraw365 licenses, you will receive an email with the license key ("ticket ID"), which can be activated directly in FluidDraw.
Go to https://www.festo.com/fluiddraw and download your FluidDraw installer.
The license key you received from the licensor after purchasing represents your digital licenses for FluidDraw. You can now either import these digital licenses into a license server, or locally onto your PC. You will need an internet connection to do this.
In the "User documentation" tab, you will find a more detailed version of the installation and license activation process. This is recommended, especially when you are setting up your own network license server.
Activating a License on a Single PC
1. If you haven’t already done so, download the installation program for FluidDraw from our Download area
2. Install and start FluidDraw on the PC
3. FluidDraw searches for available license servers in the network at startup
If no license is found, a dialog box appears with an appropriate message. In this dialog box, click on "Activate license..." to start the activation wizard.
4. You can now enter your license key ("Ticket ID") in the activation wizard
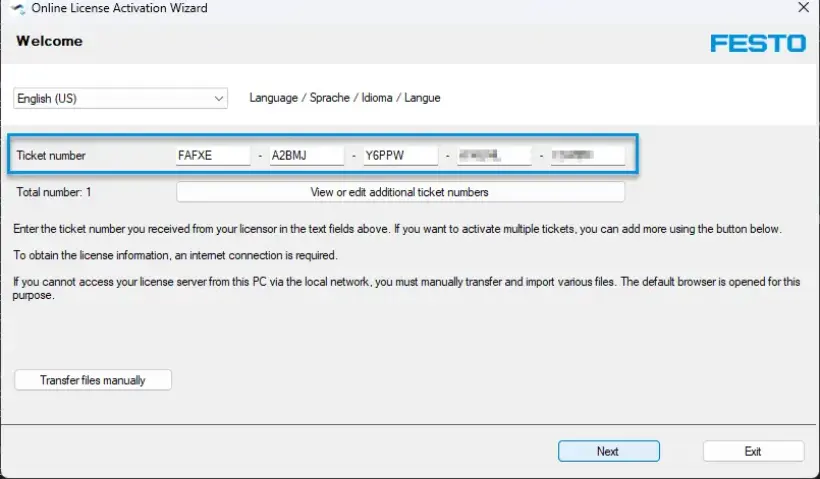
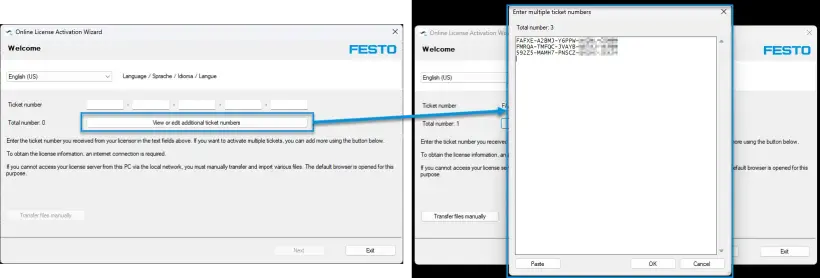
5. If you have multiple license keys that, you want to enter simultaneously, click on “View or edit additional ticket numbers” to paste in all license keys at the same time
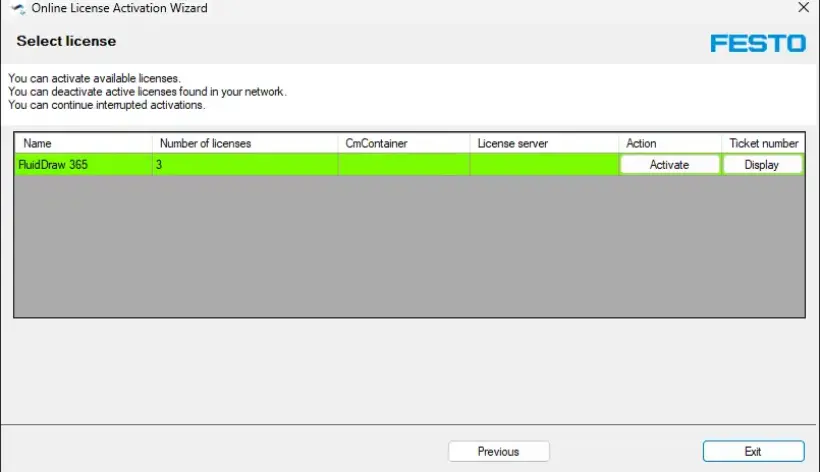
6. Follow the steps through the wizard to activate the license on your PC
How to Activate Your AX Controls License
There are 2 ways to activate your licenses:
This is the preferred and more convenient method.
Prerequisites:
- MyFesto account. Purchased licenses with the corresponding customer number. The account must be linked to the customer number.
- PC with Festo Automation Suite and a connection to the internet and to CEPE.
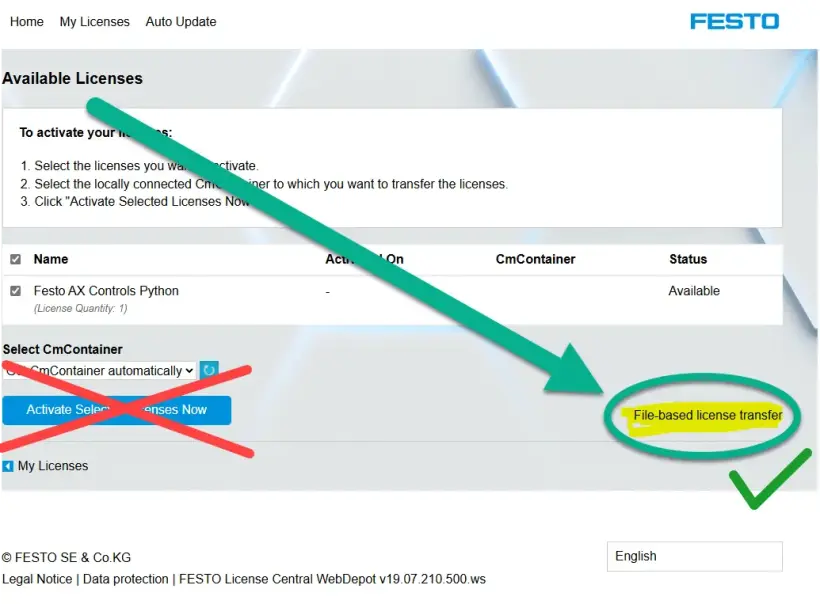
Offline means that CEPE, WBM and the engineering PC can be offline (without an internet connection). Note: Do not click on "Activate Selected Licenses Now". If you click on "Activate Selected Licenses Now", the license will be activated on your local laptop/PC and you will not be able to activate it on your device anymore.
- Festo CODESYS licenses License Portal must be used, as the CODESYS licenses are not available in WebDepot.
- Festo licenses.
Activating Licenses with Festo Automation Suite:
1. Click on "Login" in the title bar to connect to the MyFesto account by entering "Login" in the title bar
2. Open device scan section
3. Select device
4. In the "Actions" section, select the "Licenses" menu option. Enter the password for the device. The factory default password for the user "Admin" is printed on the type plate
The licenses available for the selected device will be displayed.
5. Select license
Properties and information on the selected license are displayed.
6. Click on "Activate"
The license is activated on the device
Activating Licenses with WBM:
1. Generate a license context file:
- Open License Manager in WBM:
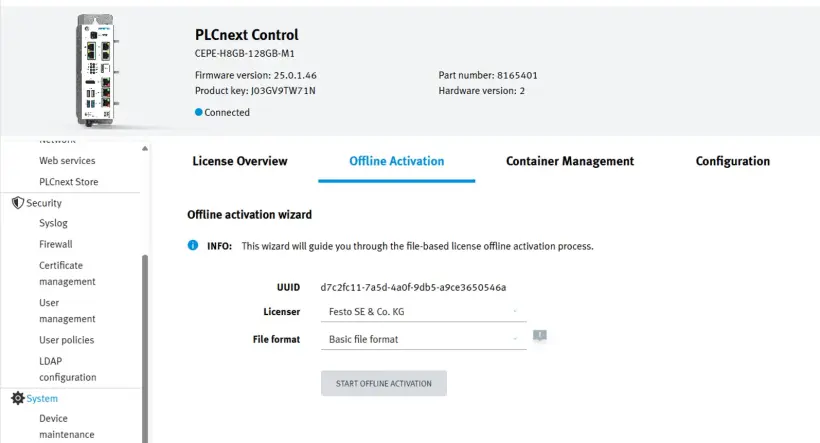
- Select tab "Offline Activation" for the Festo Edge license container
- If the container cannot be selected, go to the tab “Container Management” and click on the plus sign of the container you want to select
- For Festo CODESYS Licenses: Use the Festo CODESYS Edge license container
- Select "Basic file format"
- Press "Start Offline Activation"
- Download the xyz.WibuCmRaC file
This license context file should be generated every time the license has been updated!
2. Activate the license update file
- Go to Festo WebDepot: FESTO AG & Co.KG | Licenses
- For Festo CODESYS Licenses: Use the CodeMeter License Portal instead of the WebDepot
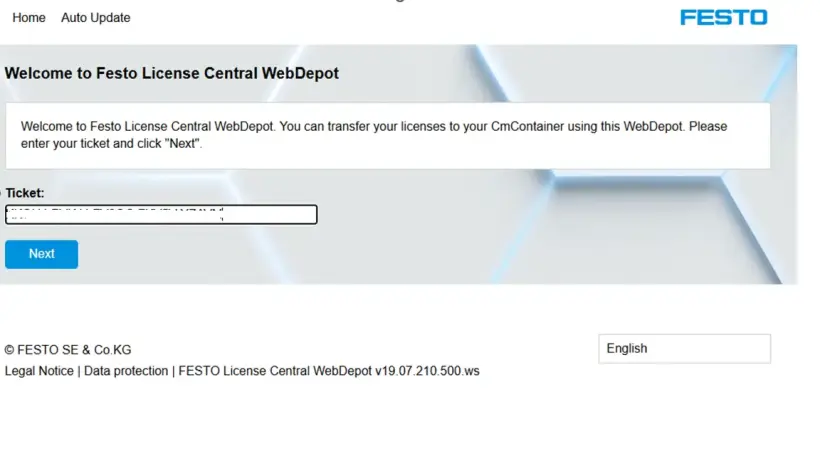
- Enter your license ticket in the text field and click on "Next":
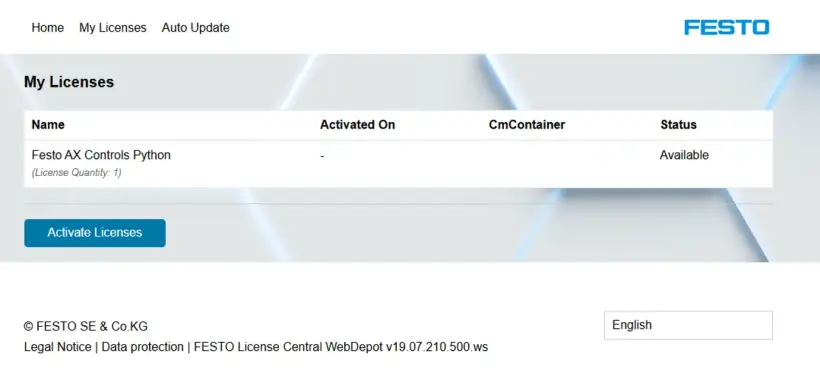
- On the next screen, click on "Activate Licenses":
- Then click on "File-based license transfer":
If you click on the blue button, the license will be “burnt” and you cannot download it to your container. You should therefore use the link on the right that is highlighted in yellow and has a green tick!
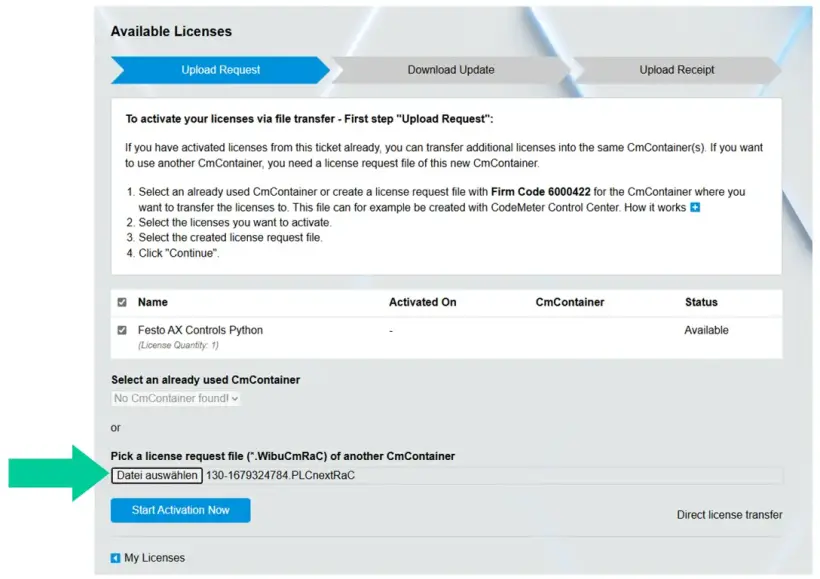
- Select the license file created in step 1 and click on "Start Activation Now":
3. Download the license update file:
- If the correct license was selected, click on "Download License Update File Now":
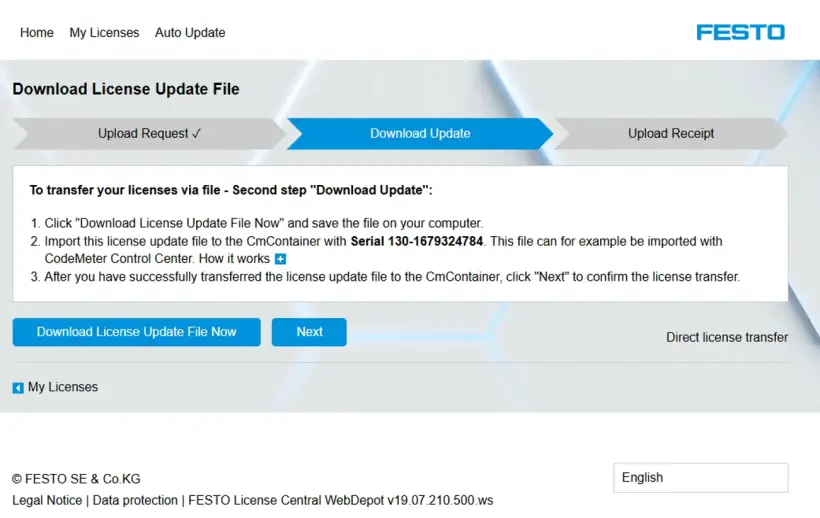
Download the file xyz.WibuCmRaU
4. License installation:
- Go back to WBM and click on "Next":
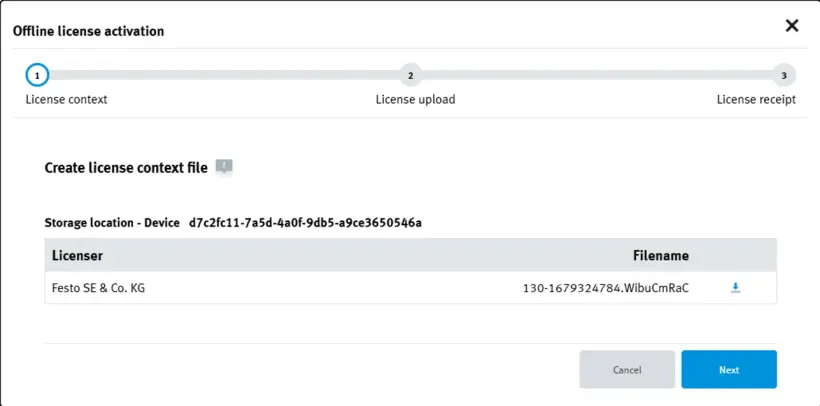
- Click on "Select File" and select the license file xyz.WibuCmRaU you just downloaded:
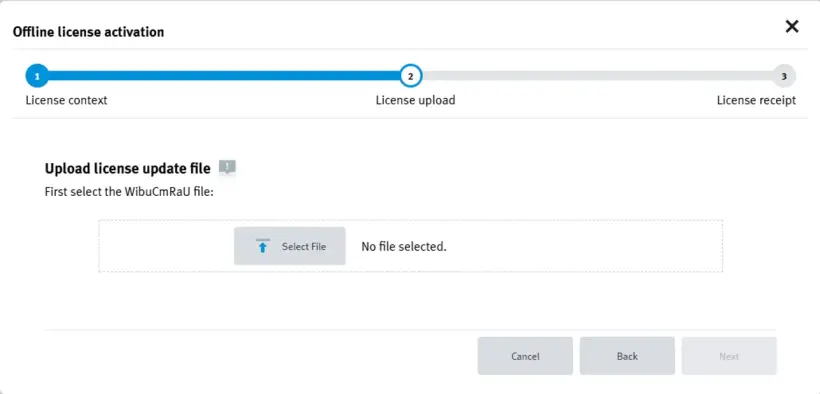
- Click on "Next":
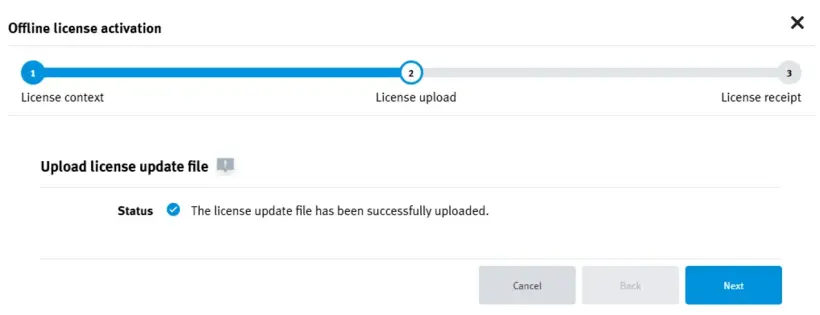
- Download the receipt file:
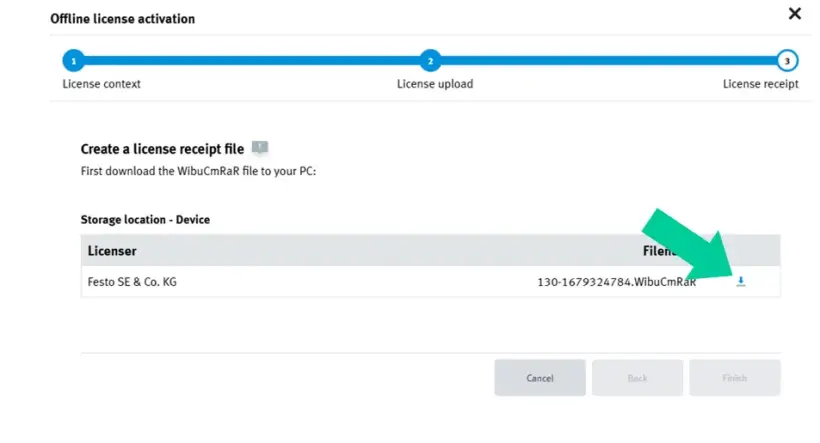
- Click on "Finish":
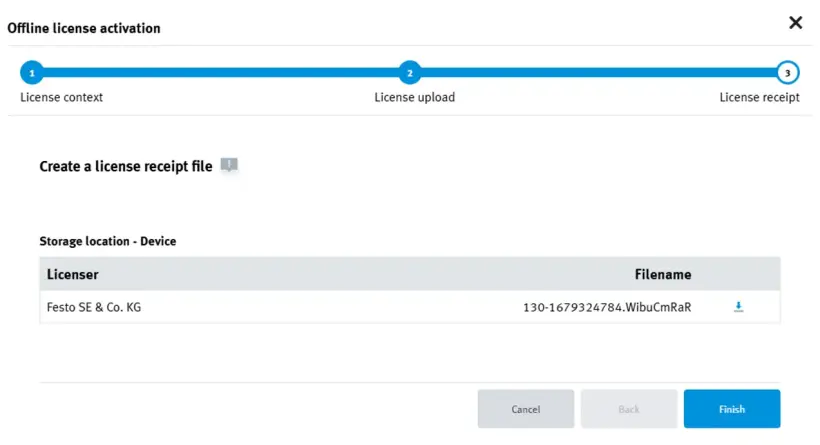
5. Finish installing the license in WebDepot
- Go to Festo WebDepot and click on "Next":
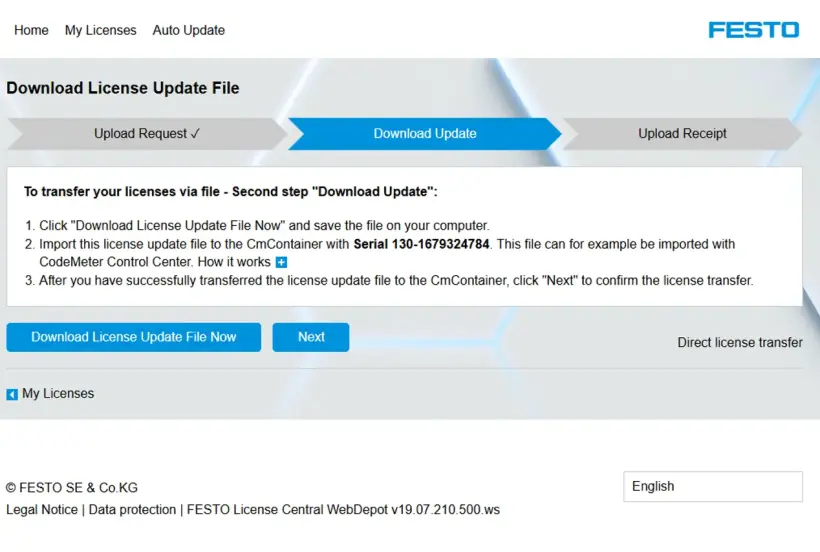
- Select file xyz.WibuCmRAR or an updated xyz.WibuCmRAC file (that means *.WibuCmRaC will be displayed in the dialog box; both are okay) and click on "Upload Receipt Now"
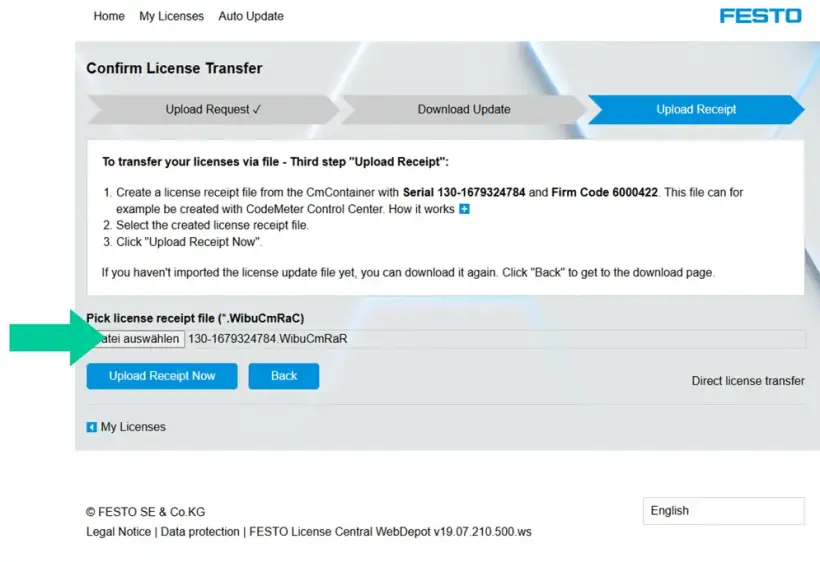
- Once the process is finished, click on "OK":
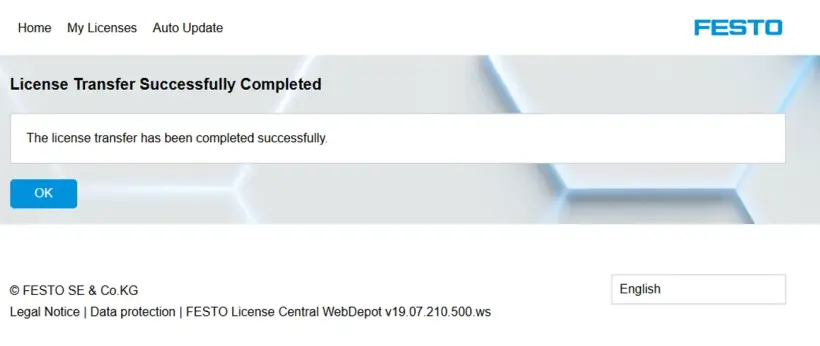
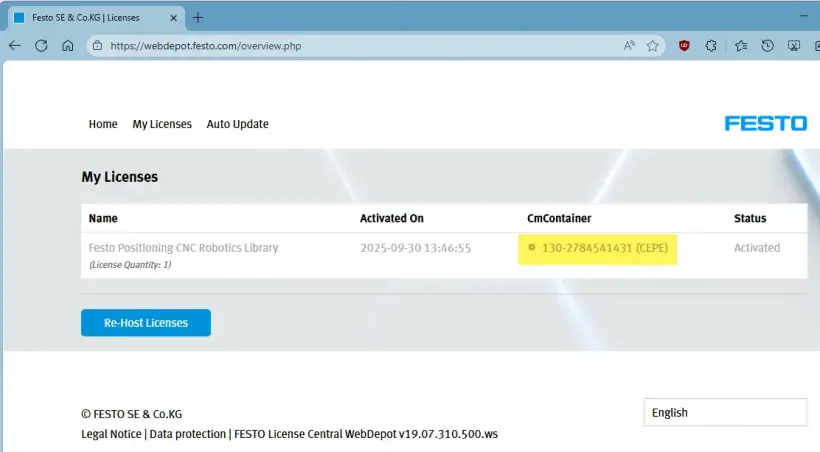
- The license status in WebDepot should now be "Activated"
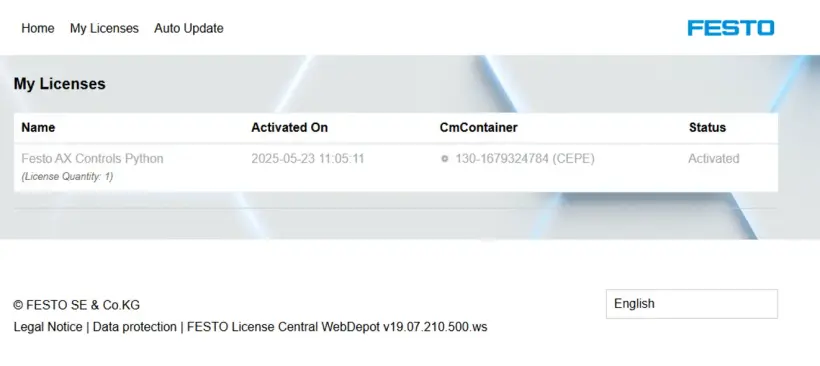
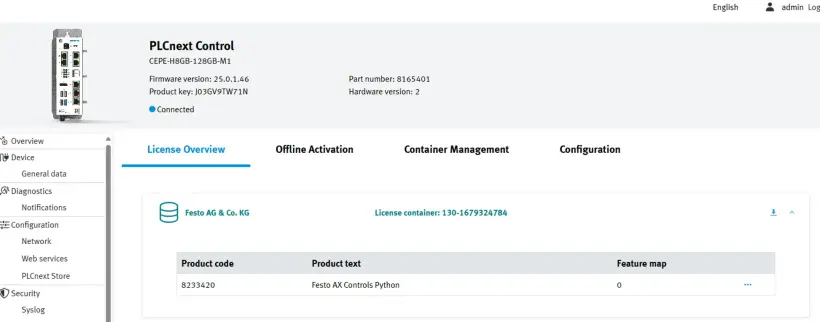
6. Check license
- Go back to WBM and select "License Overview"
How to Activate Your FluidSIM License
Quick Summary:
If you have a FluidSIM 6 license:
• Download FluidSIM here
• In the next passage decide between option 1 (license manager; recommended) or option 3 (only if you work offline) for managing your licenses.
If you have a FluidSIM 365 license:
• Access FluidSIM Web here
• In the next passage decide between option 1 (license manager) or option 2 (if you also use Festo LX) for managing your licenses.
• Download FluidSIM for Windows here
There are 3 ways to activate your licenses:
The best way to activate and manage your FluidSIM 365 license depends on how you want to use FluidSIM and if you have a permanent internet connection available:
If you want to use FluidSIM:
1. on Windows and/or in the web (fluidsim.festo.com) -> Redeem your license in the FluidSIM License Manager (permanent internet connection required)
Best for: Schools or training centers that prefer controlled group-based access without using Festo LX.
2. in the web (fluidsim.festo.com) and in Festo LX -> Redeem your license in Festo LX (permanent internet connection required)
Best for: Institutions using Festo LX or managing users via an LX organization.
3. on Windows onlyin offline mode -> Redeem your license in the FluidSIM Activation Wizard (one-time internet connection required)
Best for: Environments without permanent internet access (only supports the Windows version of FluidSIM)
- A FluidSIM V6 license can be used on Windows only. Therefore, it can only be used with the 1st and 3rd option.
- You may switch between all activation methods at any time.
1. Activation via License Manager
- Works with FluidSIM Windows- and Web version
- Needs permanent internet access
Initial setup and creating student access
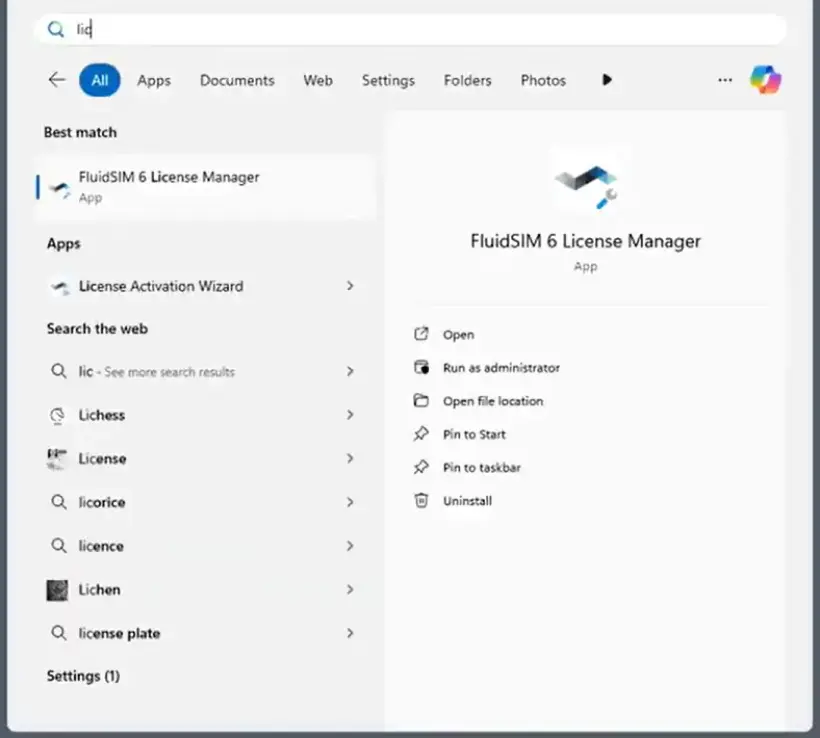
1. Open the FluidSIM License Manager on your PC
- It is automatically installed when you install the FluidSIM Windows version
- If it is not installed, you can download the complete setup or the license manager only here
2. Create an account
- If you already have an account, please move forward to step 3
- If not, click on “Create new account” and fill out the fields user name, password, and license key (ticket number) and click on “Create new account”
- The license key (ticket number) was sent to you by Festo when you purchased a license
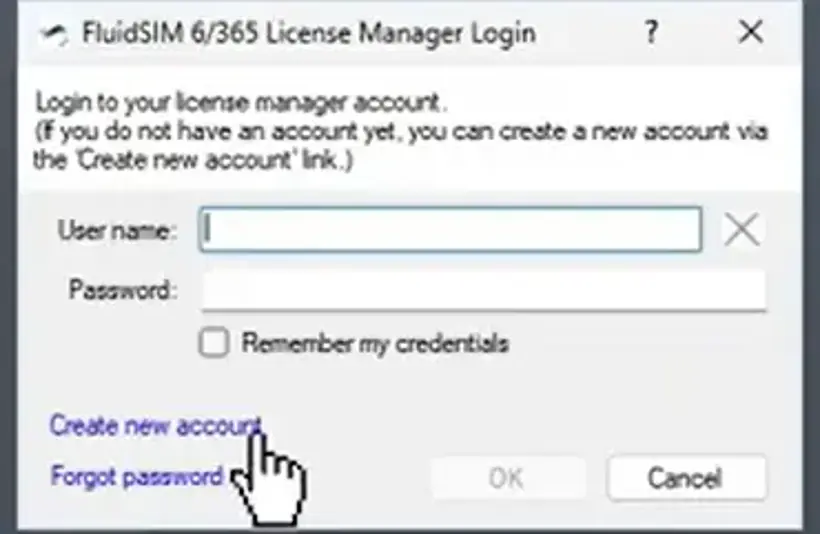
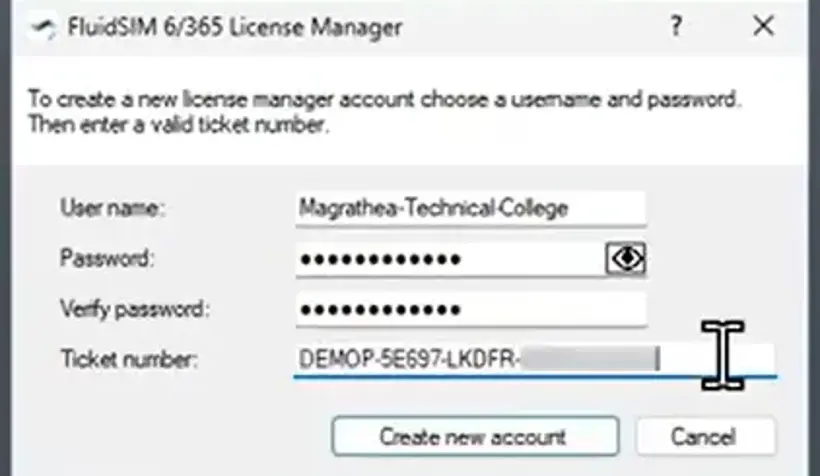
- Your account is now created
3. Login with your account
- Enter user name and password and click on “OK”
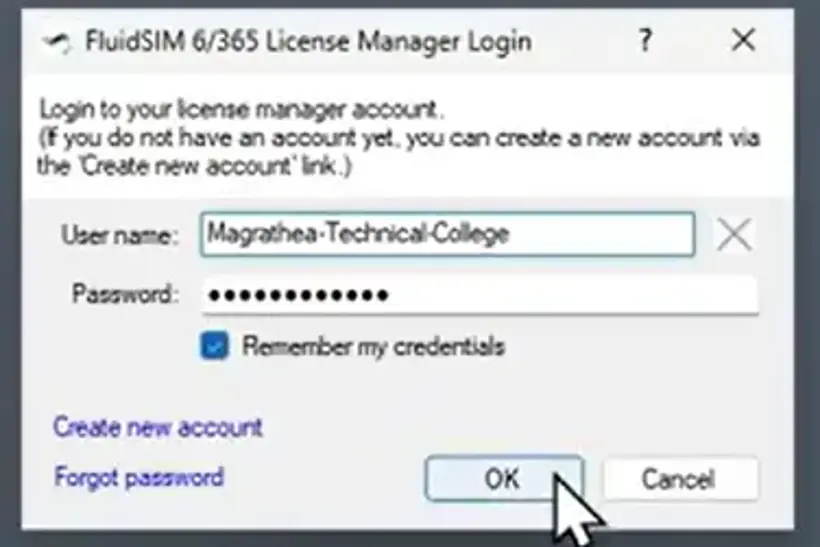
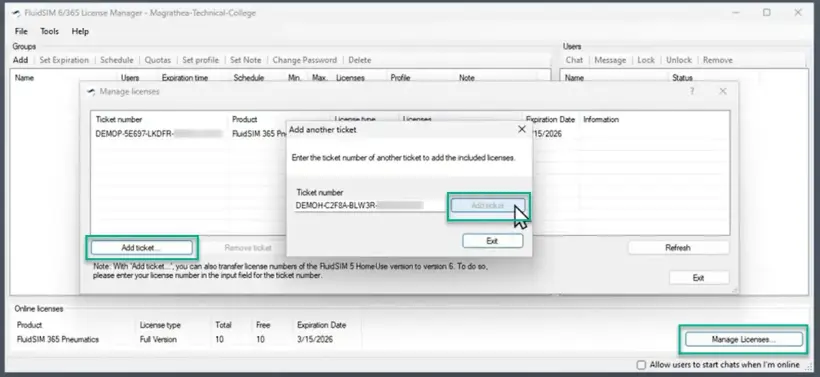
4. Add additional licenses to your account
- Click on Manage licenses -> Add ticket -> enter your license ticket
5. Create a user group
- Click on “Add” and define group name and password
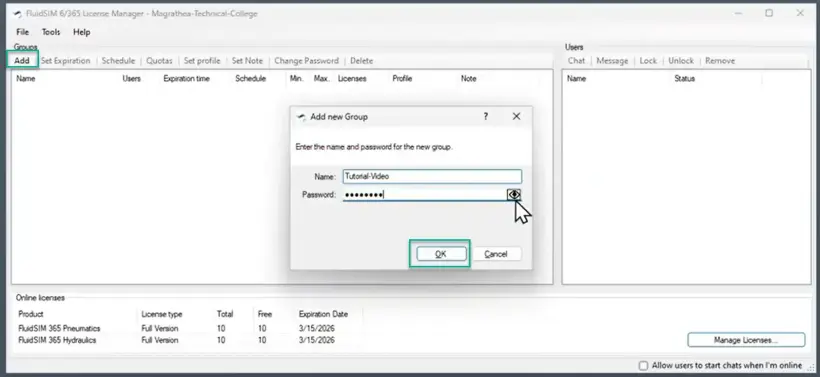
6. Share access credentials with your students
- Share groupname (in example: Tutorial-Video) and password (••••••••) via e-mail or any other format with your students, so they can login with your credentials just created
- Never share the license key (ticket number) from Festo with your students. This would give them access to managing your licenses. Share only group-level information.
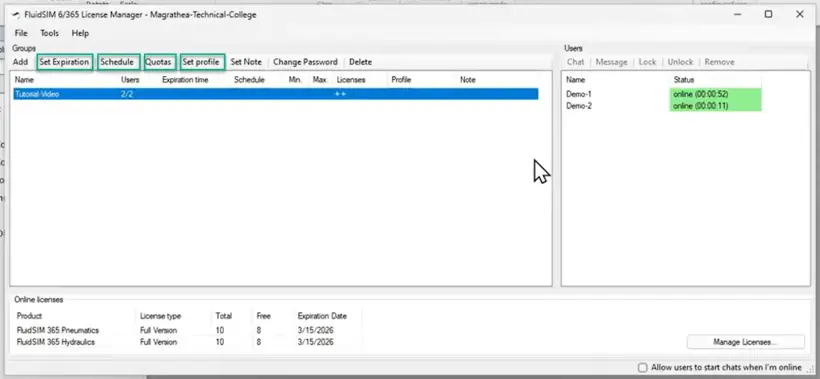
7. Advanced settings
- Create an expiration date, daily/hourly access restrictions, quotas, or set a pre-defined profile to your user group
2. Activation via Festo LX
- Works with the FluidSIM Web version and within Festo LX
- Needs permanent internet access
- Does not work for FluidSIM for Windows
Initial setup and creating student access
After you created an LX Organization, you can enter any license key in Festo LX, also the FluidSIM license key.
3. Activation via Activation Wizard
- Works with FluidSIM Windows version only
- Needs one-time internet access
- Can be used offline afterwards
Initial setup and creating student access
1. Install FluidSIM 6
Download FluidSIM V6 here and install it on your PC
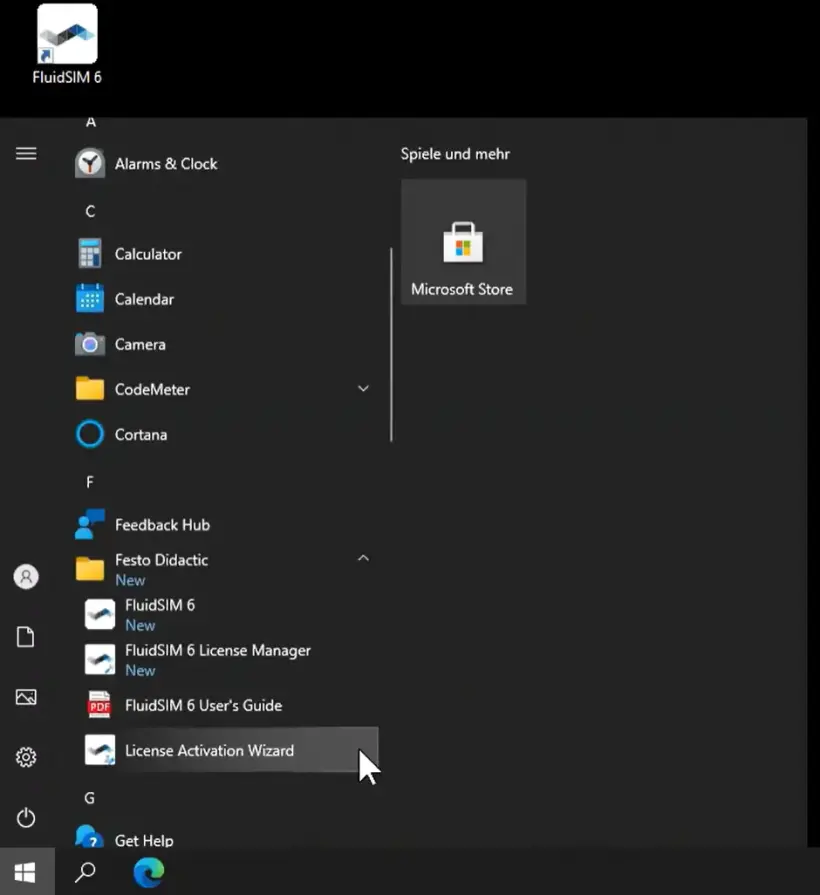
2. Open the FluidSIM activation wizard on your PC
- It is automatically installed together with the FluidSIM Windows version
- If it is not installed, you can download the complete setup or the activation wizard only here
3. Enter your license key
- The license key was sent to you by Festo when you purchased a license
- By clicking on “View or edit additional ticket numbers” you can add multiple tickets in one step
4. Activate your licenses on your PC/Server
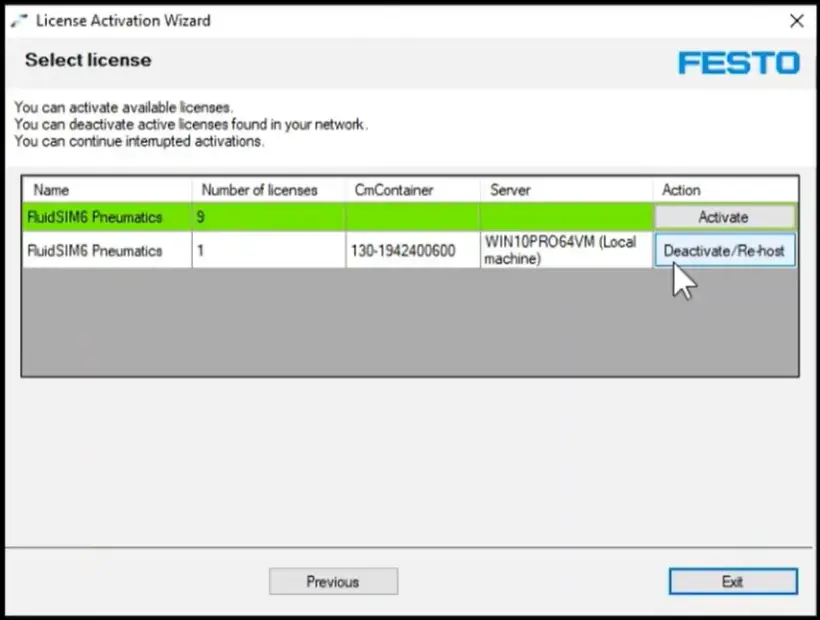
- If the entered license key was valid, the number of license seats and the technology package related to the license key will be displayed
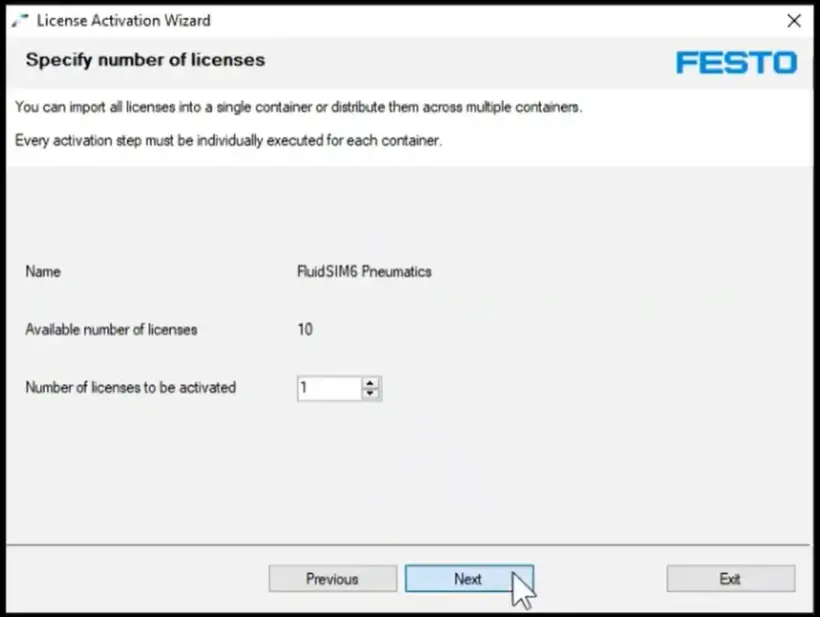
- Click on “Activate” and select the number of licenses you want to activate on your PC/Server
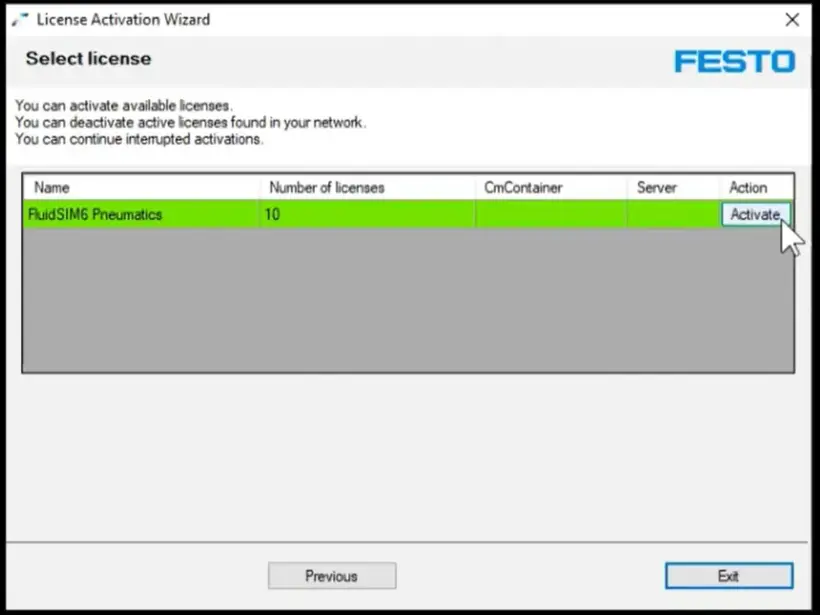
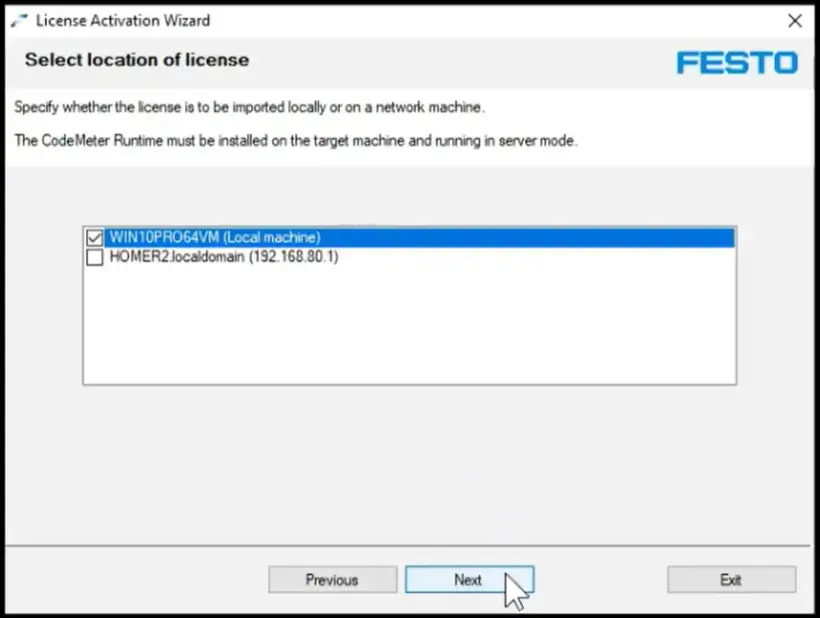
- Select the PC/Server you want to activate the licenses on
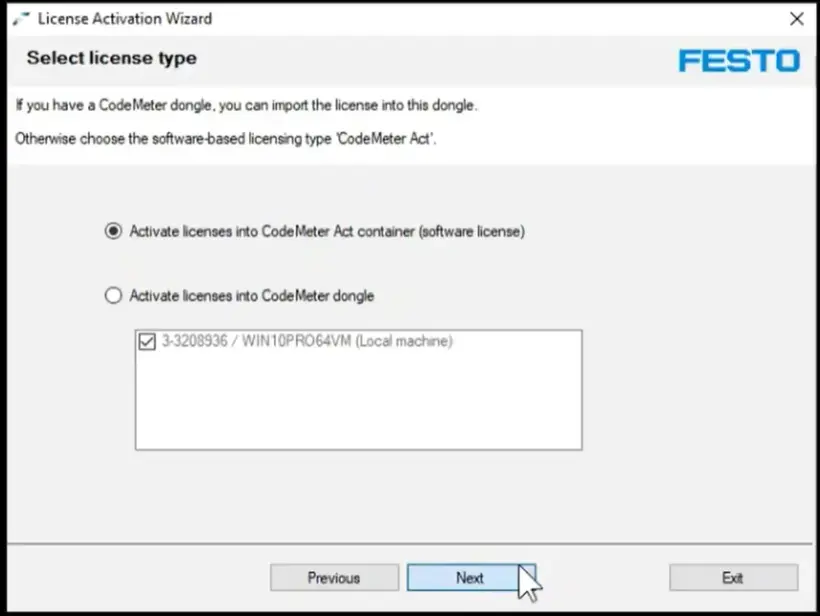
- For the license type select the first option (container), unless you want to use a USB Dongle for licensing (more info about this option here)
5. Successful Activation
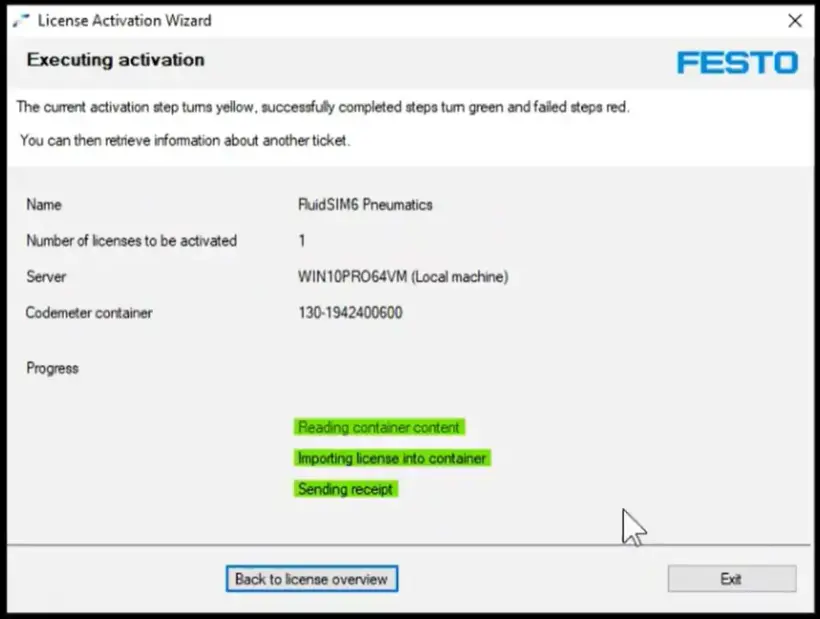
- Once you have done the prior steps you will see a confirmation of the activation
- From now on, you do not need an internet connection to run FluidSIM for Windows
6. Deactivation (optional)
- If you want to deactivate the licenses from your PC/Server simply enter your license key again in the Activation Wizard
- You will see an overview of the number of license seats and the technology package related to the license key, and if/where those are activated
- Click on “Deactivate” to deactivate the license seat from your local PC and transfer them back to the Festo Cloud. You can now use this license seat on another PC.
How to Activate Your FPosCR or PA-Toolkit License
Manually Activating the License on a Legacy PLC
1. Order the license and get the license ticket ID
Follow the online license order process
2. Go to Festo WebDepot and start the activation process
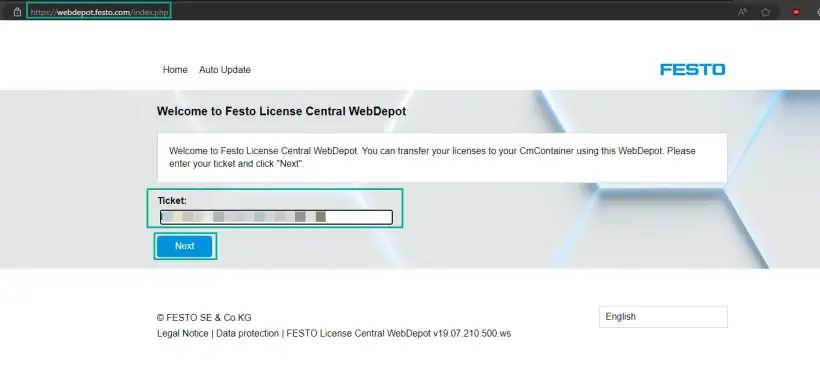
Open the license server, enter the ticket ID, click on “Next”
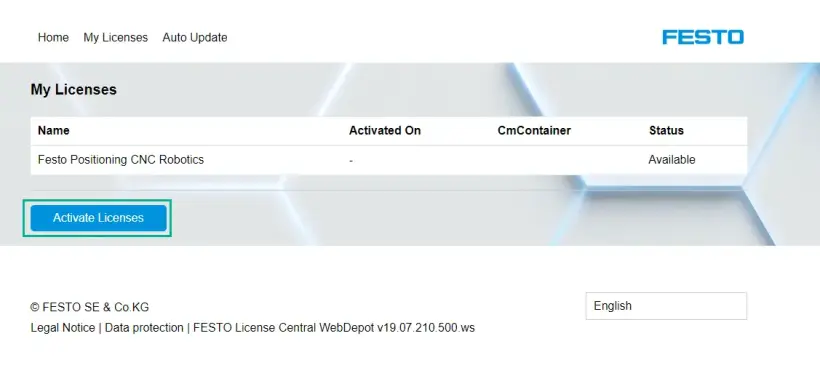
Click on “Activate Licenses”
Select the container type:
- Left: Festo AG Embedded [ 2004 ] (e.g. CECC-X, CPX-E-CEC)
- Right: Festo Edge [ 2P02 ] (e.g.CEPE) based on PlcNext platform
![Festo WebDepot screen displaying two container types: Festo AG Embedded [ 2004 ] (e.g. CECC-X, CPX-E-CEC) and Festo Edge [ 2P02 ] (e.g.CEPE) based on PlcNext platform](https://www.festo.com/media/cms/central/media/mam_upload/image5~1_w820.webp)
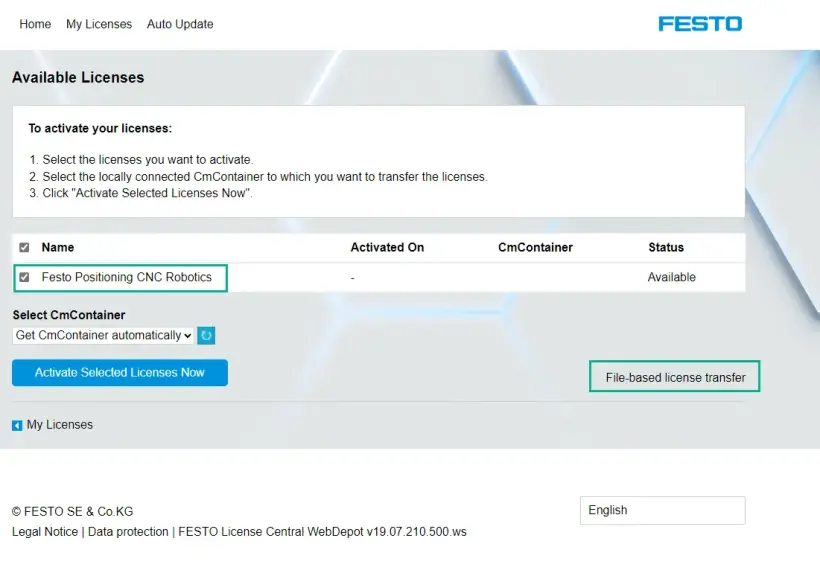
Select the license and click on “file-based license transfer”
3. Download the WibuCmRaC from the PLC
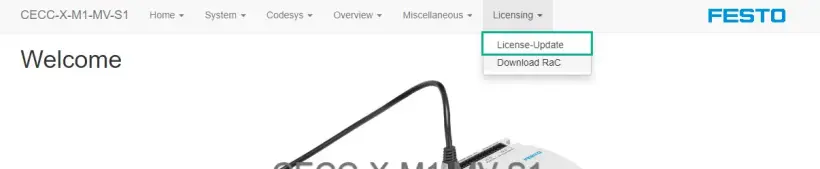
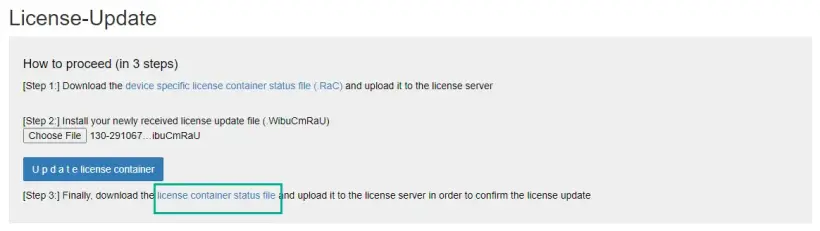
Open the web interface of your PLC (IP address in web-browser) -> Licensing -> License Update
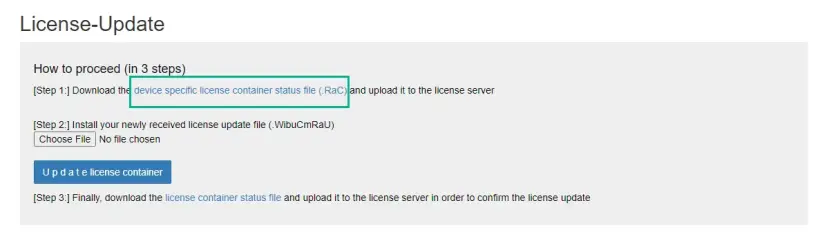
Download the license container status file
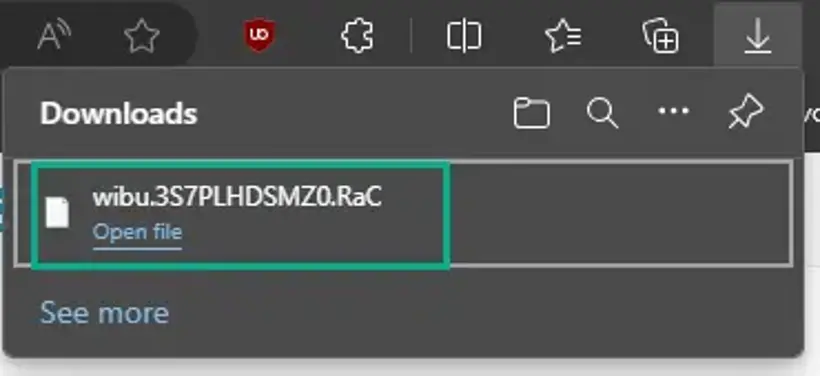
4. Upload the WibuCmRaC to the WebDepot
Go to WebDepot and select the WibuCmRac file and start the activation process
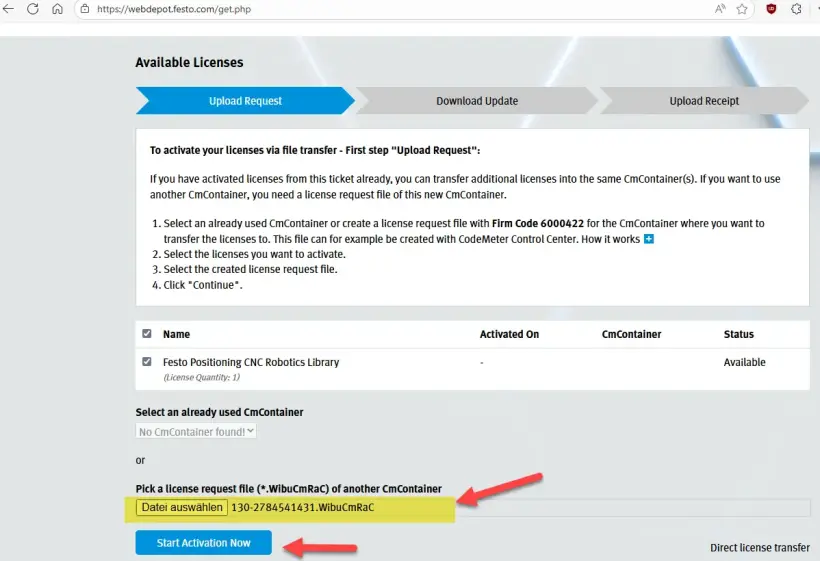
5. Download the updated WibuCmRaU to your computer
After activation, download the WibuCmRaU file onto your PC
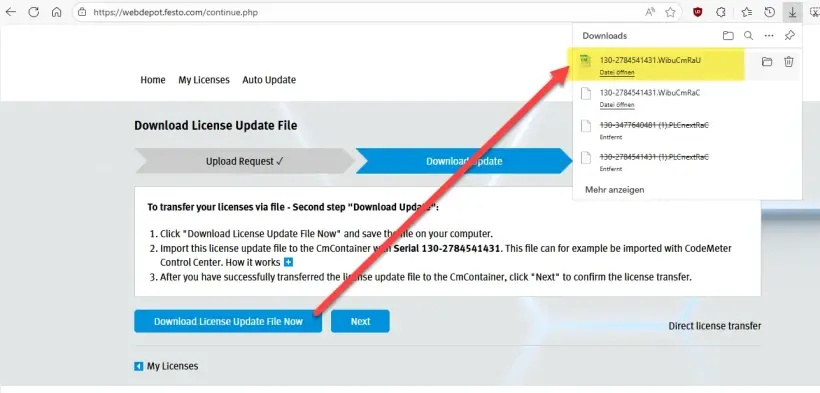
6. Upload the WibuCmRaU to the PLC
Go back to the web interface of your PLC and select the downloaded *.WibuCmRaU file
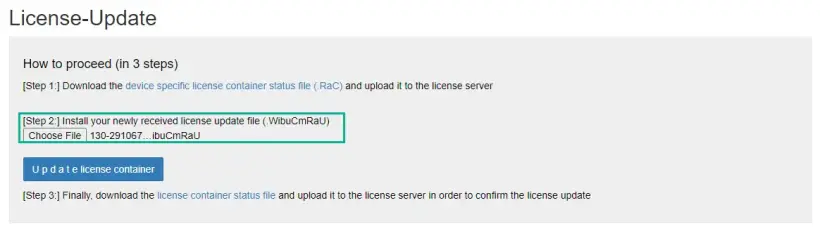
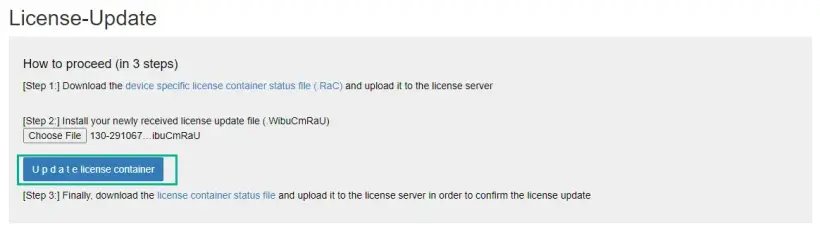
Update the license container. After a successful update, continue with step 3
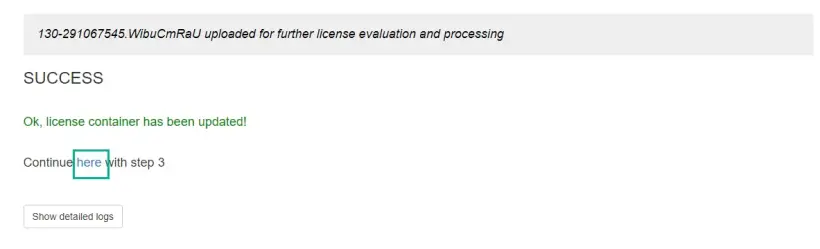
7. Download the WibuCmRaR receipt from the PLC to your PC
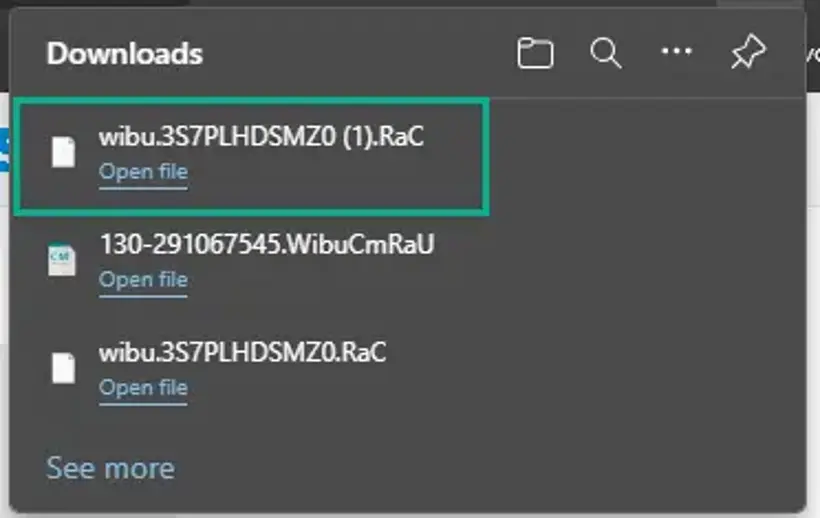
8. Upload the WibuCmRaR receipt to the WebDepot
Go back to the license server and continue with the last step
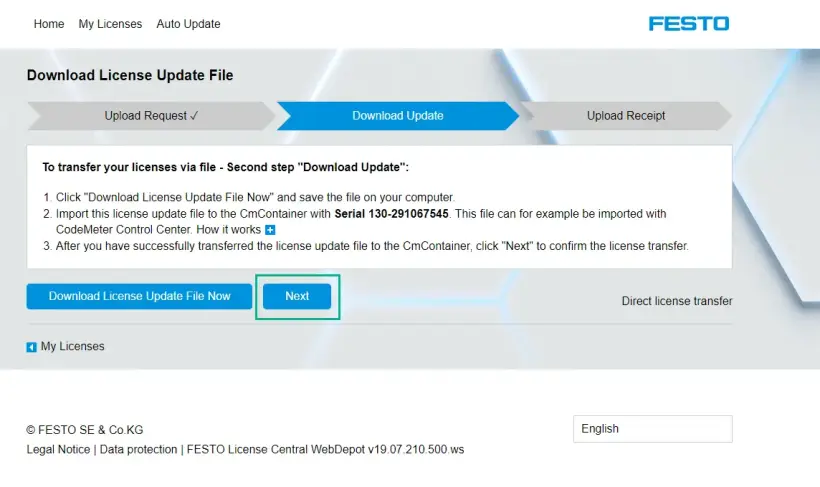
Select the latest downloaded file and upload it
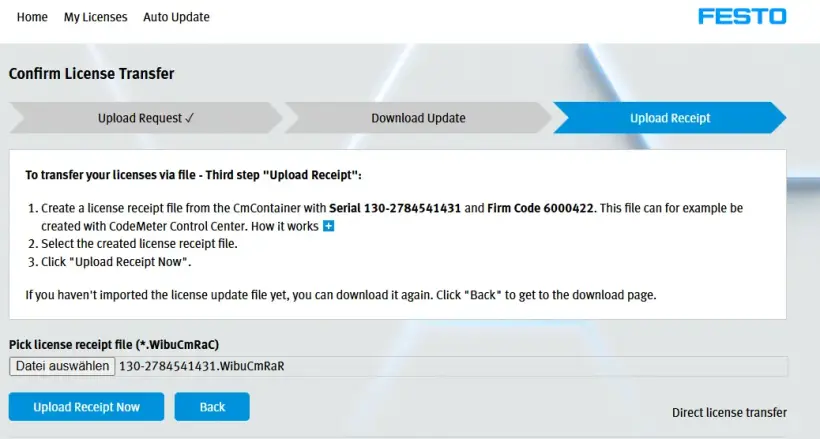
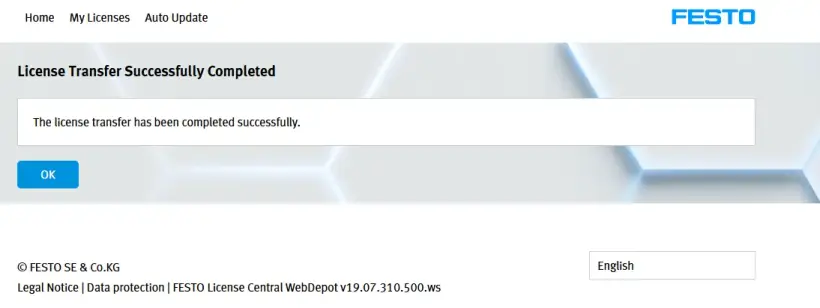
Once uploaded successfully, continue by clicking on “OK”. The FPosCR is now activated on the server.
9. Check the activation result
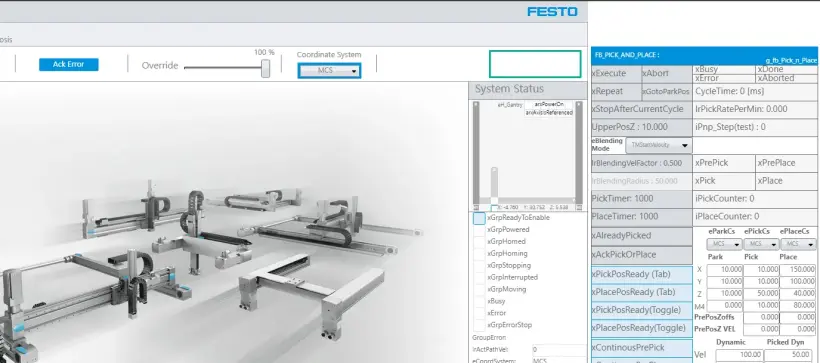
DEMO MODE is deactivated on the FPosCR
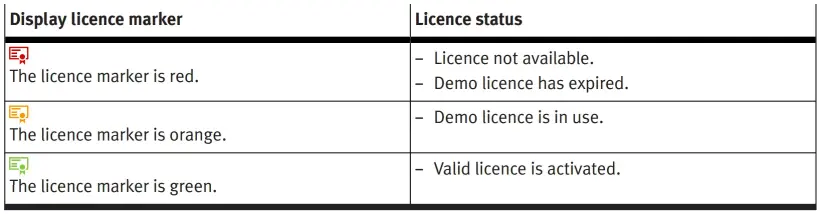
10. License symbol of PA-Toolkit indicated an activated license
Manually Activating the CEPE License
1. Order the license and get the license ticket ID
Follow the online license order process
2. Go to Festo WebDepot and start the activation process
Open the license server, enter the ticket ID, click on “Next”
Click on “Activate Licenses”
Select the container type:
- Left: Festo AG Embedded [ 2004 ] (e.g. CECC-X, CPX-E-CEC)
- Right: Festo Edge [ 2P02 ] (e.g.CEPE) based on PlcNext platform
Select the license and click on “file-based license transfer”
3. Download the WibuCmRaC from the PLC
Check the license container name with the corresponding firm code -> For FPosCR, the container with the firm code 6000422 should be used
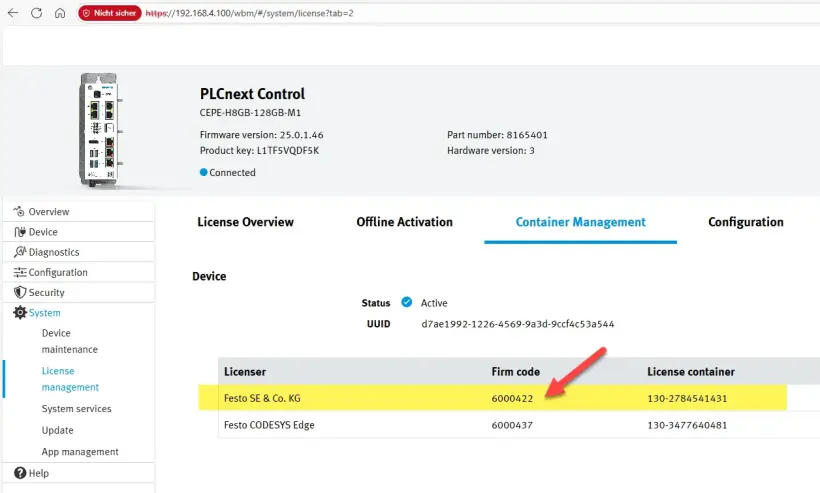
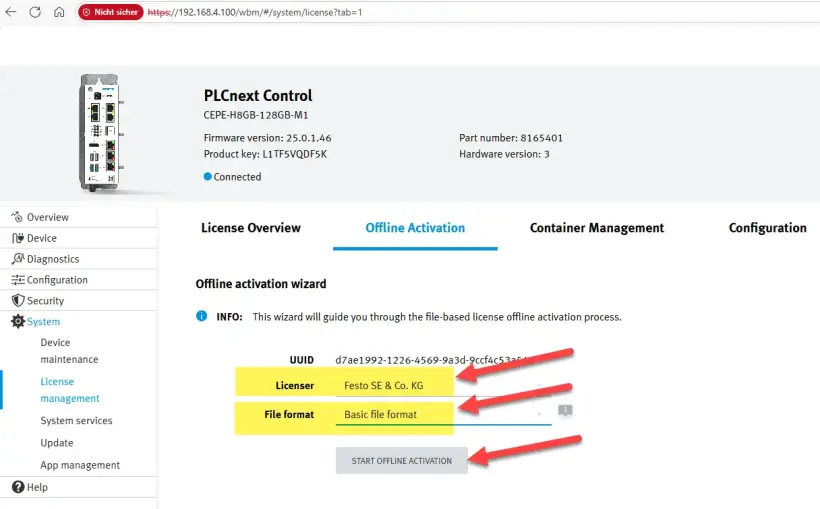
Go to Offline Activation, select the correct container (licenser) and file format and click on "Start Offline Activation"
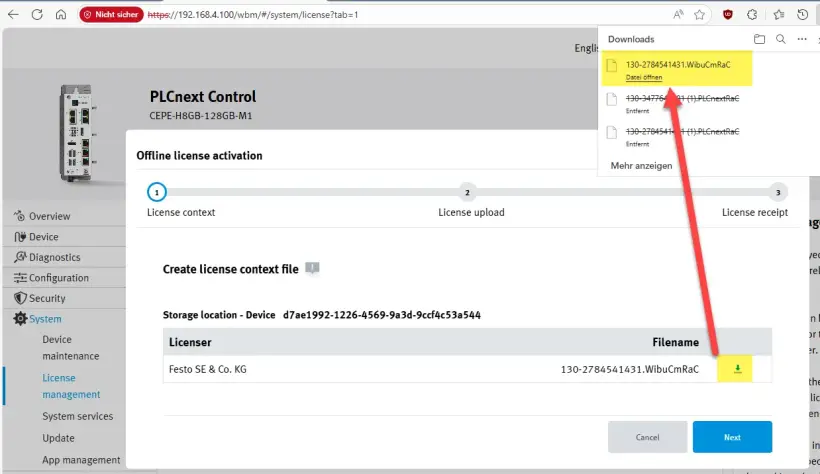
Download the WibuCmRaC file to your PC and click on "Next"
4. Upload the WibuCmRaC to the WebDepot
Go to WebDepot and select the WibuCmRac file and start the activation process
5. Download the updated WibuCmRaU to your computer
After activation, download the WibuCmRaU file to your PC
6. Upload the WibuCmRaU to the PLC
Select the WibuCmRaU file
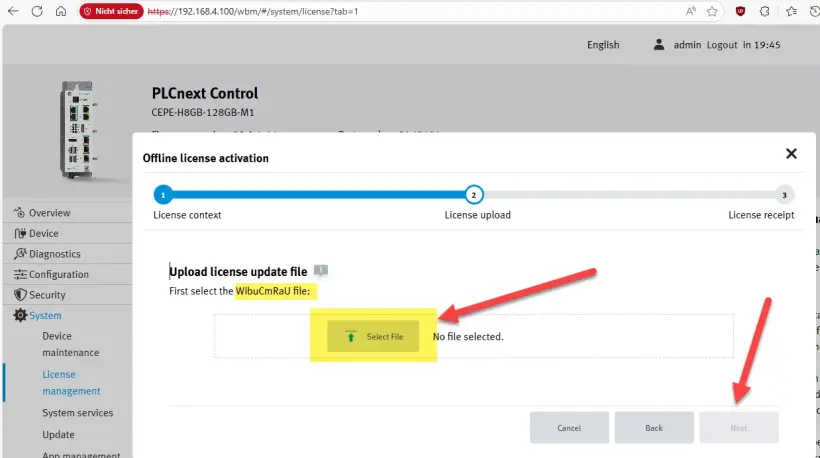
When the upload is ready -> Click on "Next"
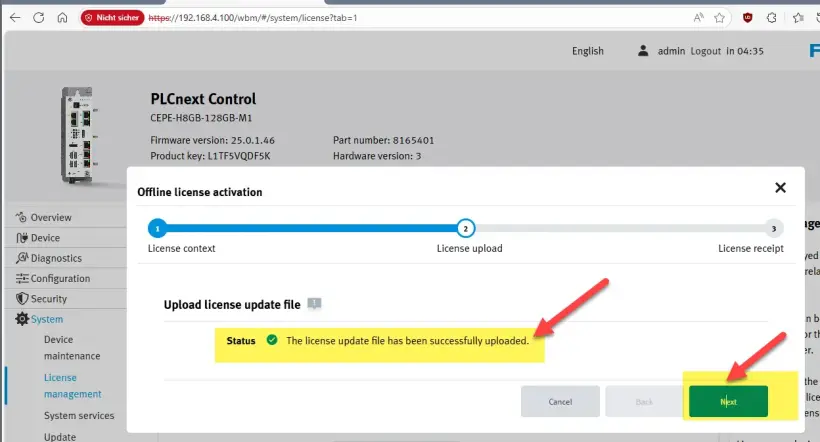
7. Download the WibuCmRaR receipt from the PLC to your PC
Download the receipt file -> Click on "Finish"
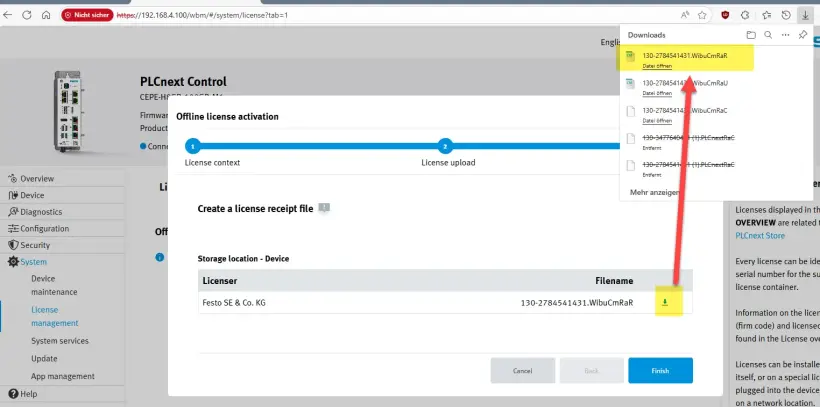
8. Upload the WibuCmRaR receipt to the WebDepot
Upload the WibuCmRaR to the WebDepot
The activation process is finished
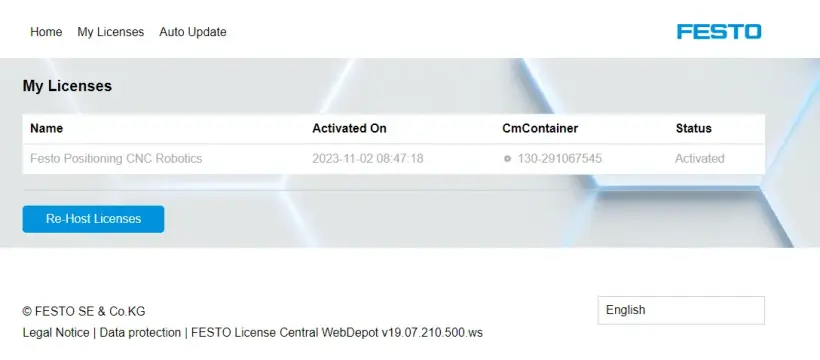
9. Check the activation result
DEMO MODE top right is deactivated on the FPosCR
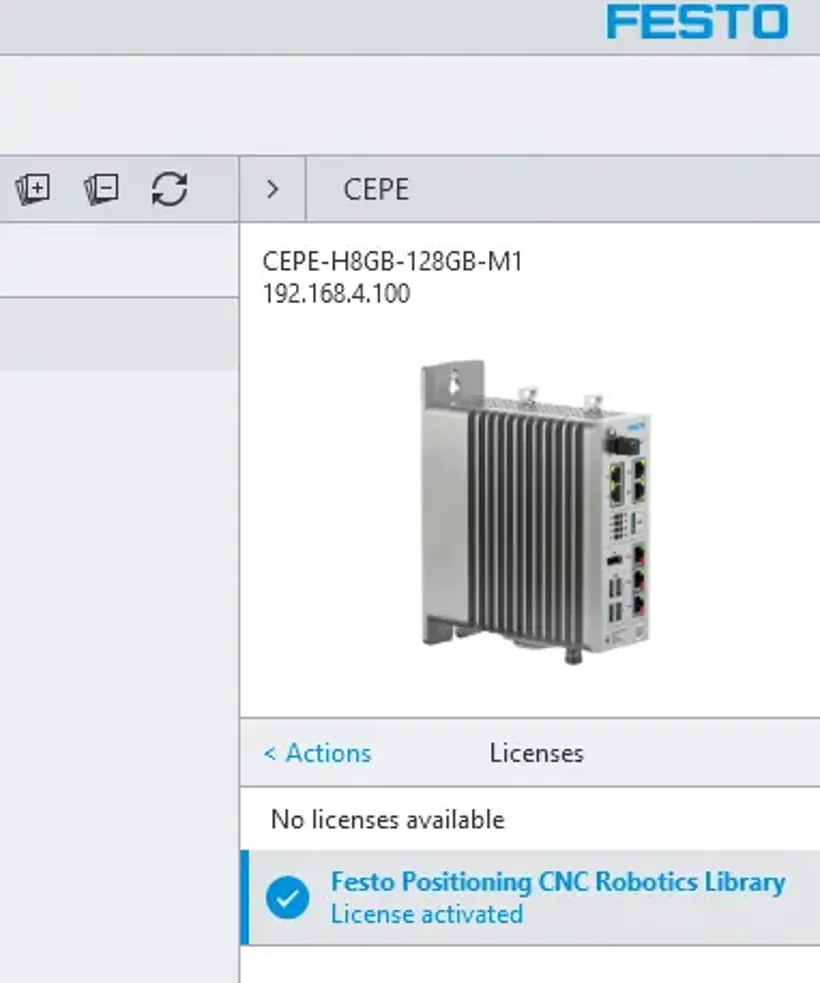
Manually Rehosting the CEPE License
1. Get the license ticket ID
Get the license ticket ID of the license on your PLC
2. Go to Festo WebDepot and start the rehost process
Open the license server, enter the ticket ID, click on “Next”
Click on “Re-Host Licenses”
If the license has been used for activation, you will see the activation date as well as the CmContainer Number where the license was activated.
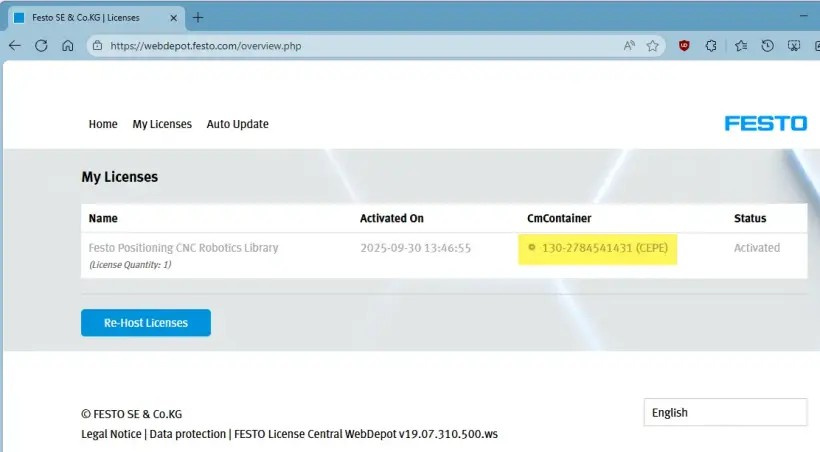
Select the license and proceed with “File-based license transfer”
This screen shows an error because it didn‘t find the correct CmContainer on your PC.
That is why we proceed with file-based license transfer
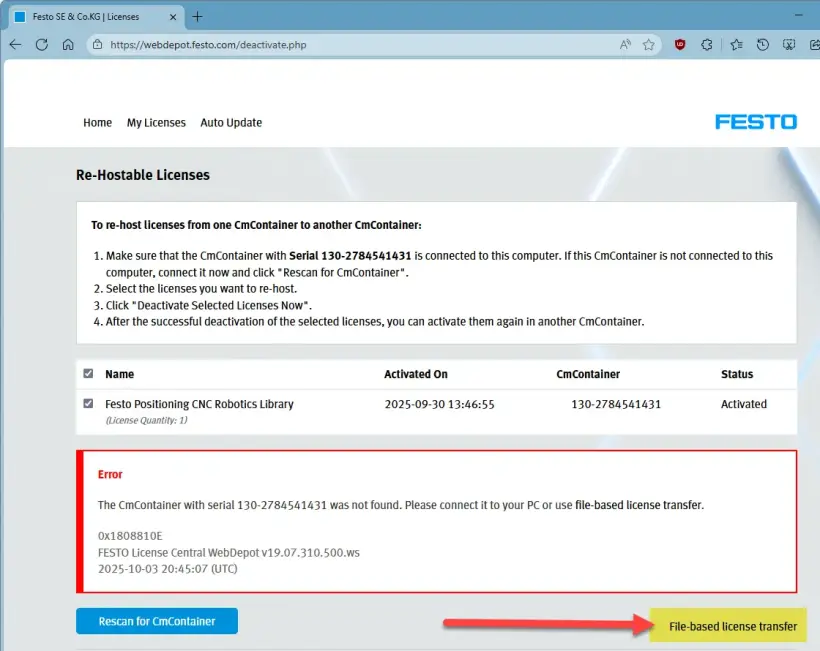
Stay on this screen and proceed on the CEPE side.
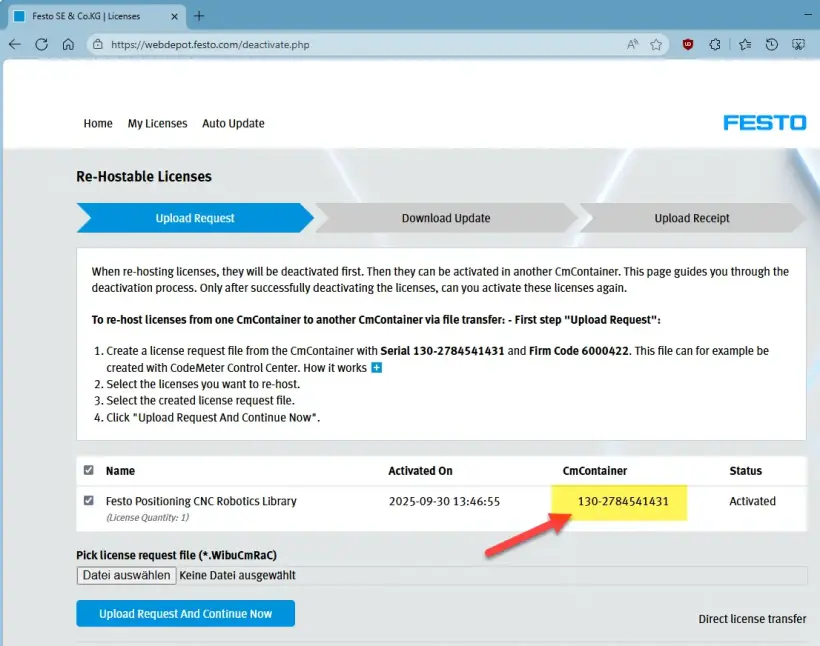
3. Download the WibuCmRaC from the PLC
Check the license container name with the relevant firm code -> For FPosCR, the container with the firm code 6000422 should be used
Check the correct license container number (CmContainer)
Go to "Offline Activation", select the correct container (licenser) and file format and click on "Start Offline Activation"
Download the WibuCmRaC file to your PC and click on "Next"
4. Upload the WibuCmRaC to the WebDepot
Go to WebDepot and select the WibuCmRaC file and start the re-host by clicking on "Upload Request And Continue Now"
5. Download the updated WibuCmRaU to your computer
After activation, download the WibuCmRaU file to your PC and click on "Next"
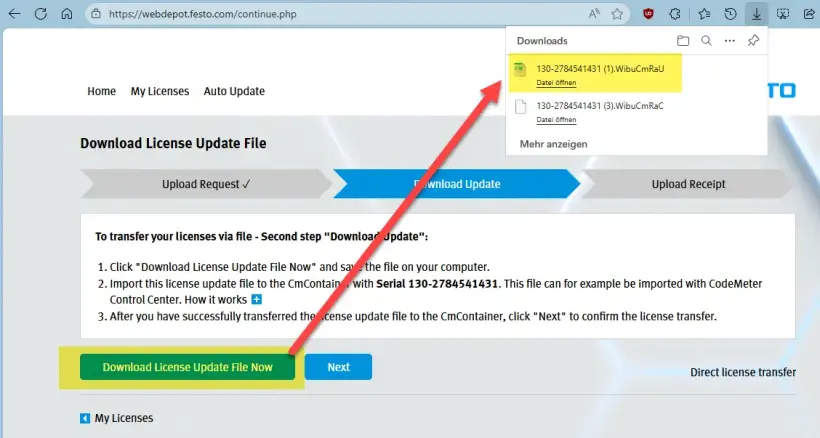
Stay on this screen
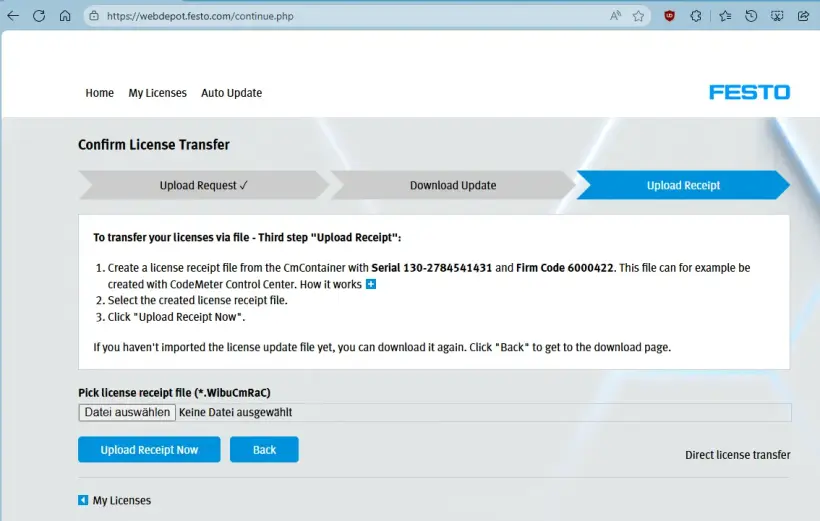
6. Upload the WibuCmRaU to the PLC
Select the WibuCmRaU file
When the upload is ready -> Click on "Next"
7. Download the WibuCmRaR receipt from the PLC to your PC
Download the receipt file -> Click on "Finish"
8. Upload the WibuCmRaR receipt to the WebDepot
Upload the WibuCmRaR to the WebDepot
The activation process is finished
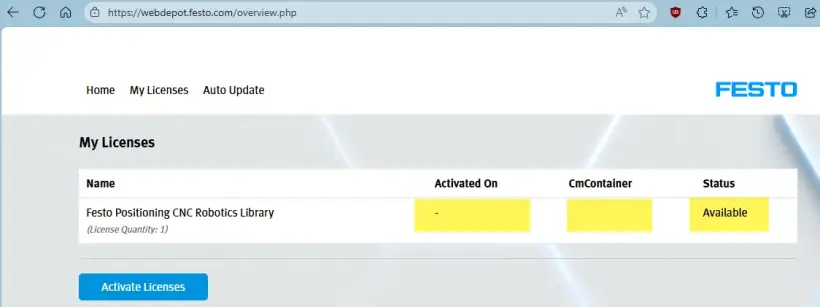
9. Check the activation result
Check the license on CEPC wbm
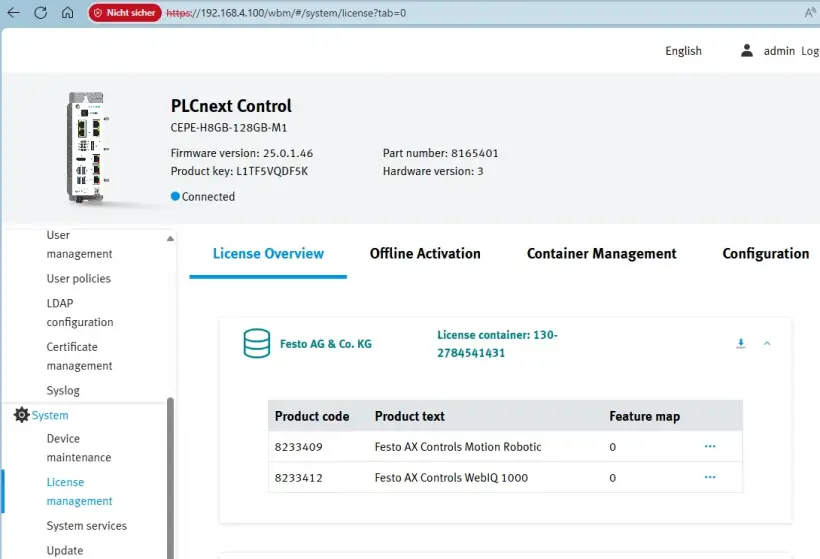
DEMO MODE top right is deactivated on the FPosCR
How to Activate Your AX Industrial App License
Activate Your AX Industrial Apps License
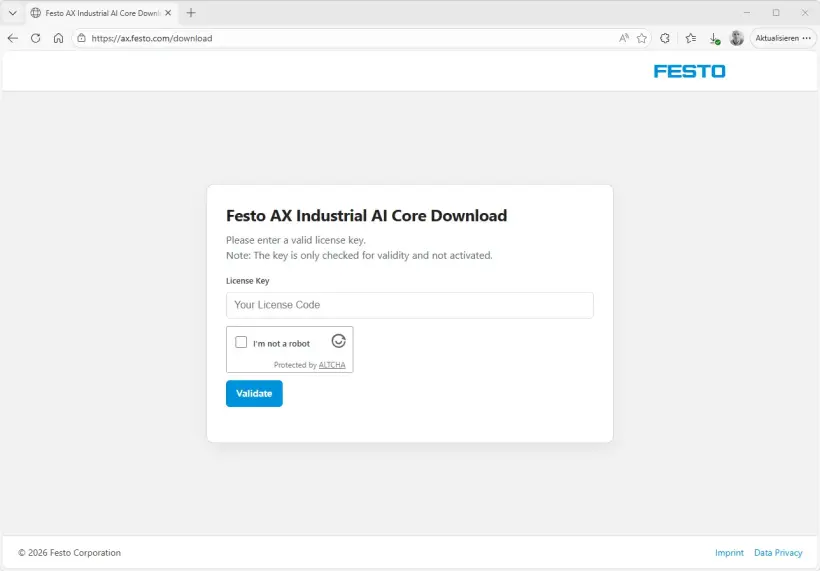
1. Get your installation files for the Festo AX Industrial AI Core
- Go To https://ax.festo.com/download
- Enter received license key
- Your installation package is generated
- Download and unzip
- Follow instructions in "readme.txt" file and "Application Note"
2. When starting, a license is needed to enable the app. Enter the license key received from Festo via email
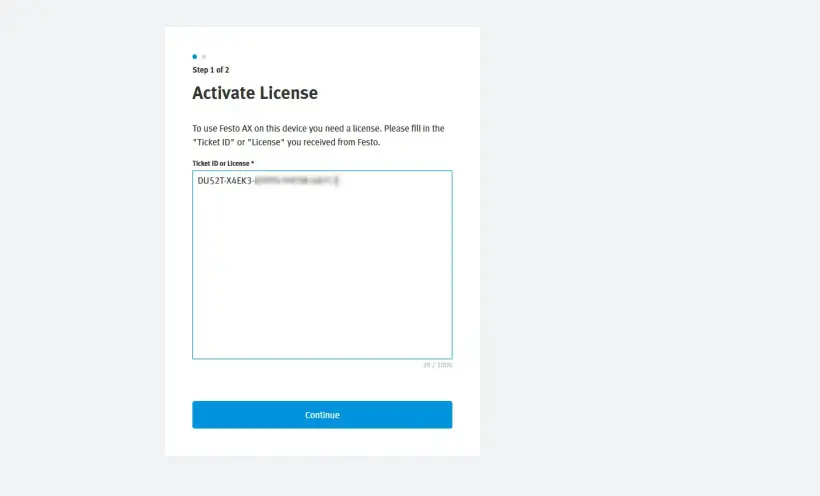
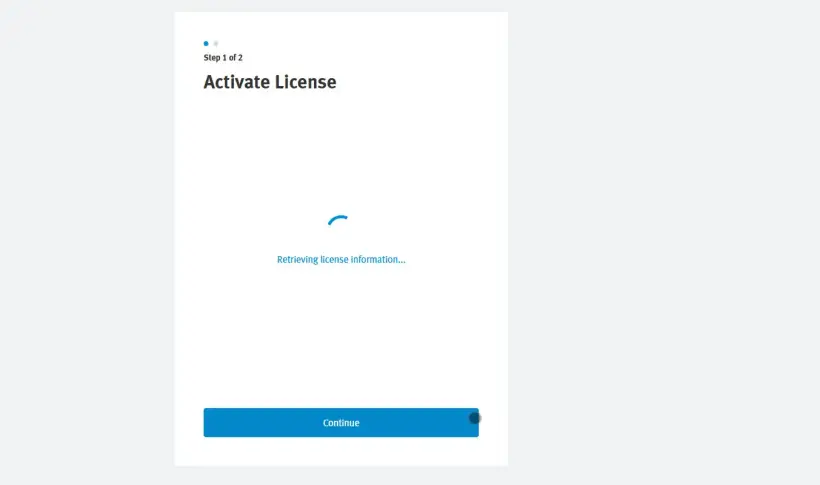
3. The license information is retrieved from the central server, so an internet connection is needed
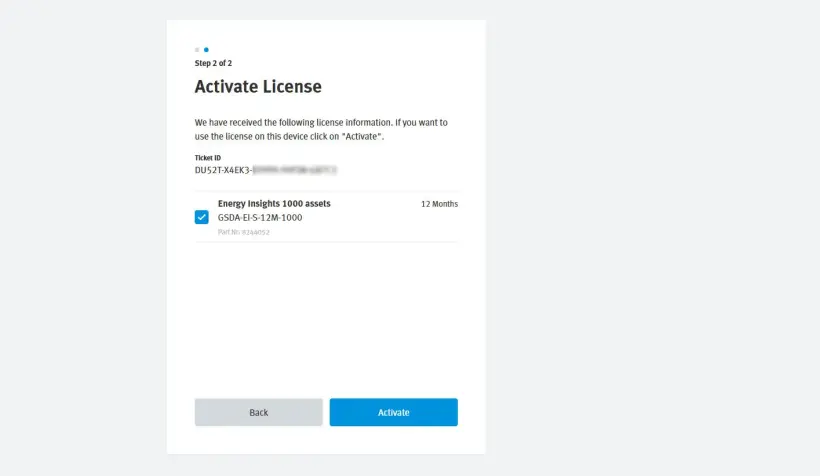
4. Select the licenses you want to activate on this device/AX instance and click on "Activate"
5. The license is activated. An internet connection is needed for that handshake
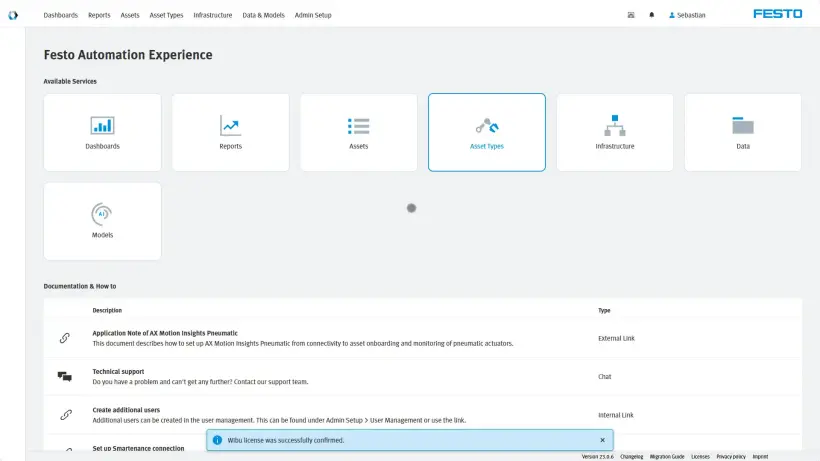
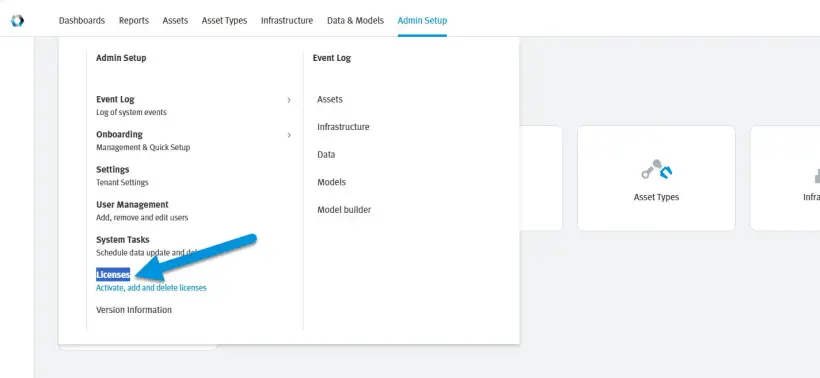
6. To see an overview of all licenses, go to "Admin Setup" > "Licenses"
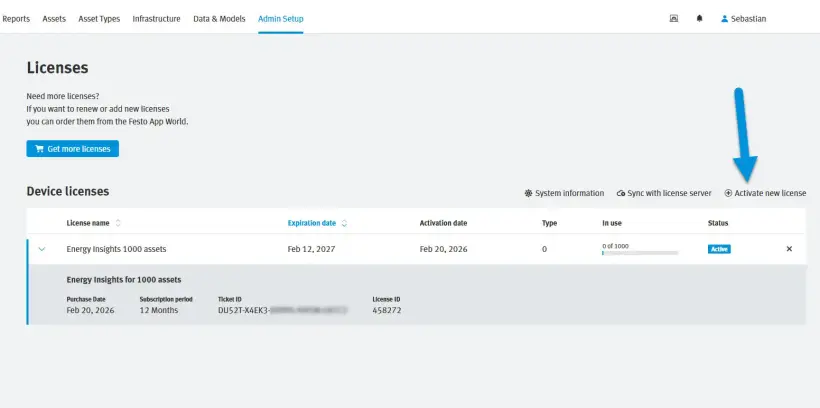
7. You will get an overview of all activated licenses and their consumption. Additionally, you can activate more licenses from that screen, and deactivate licenses by clicking on the "×"
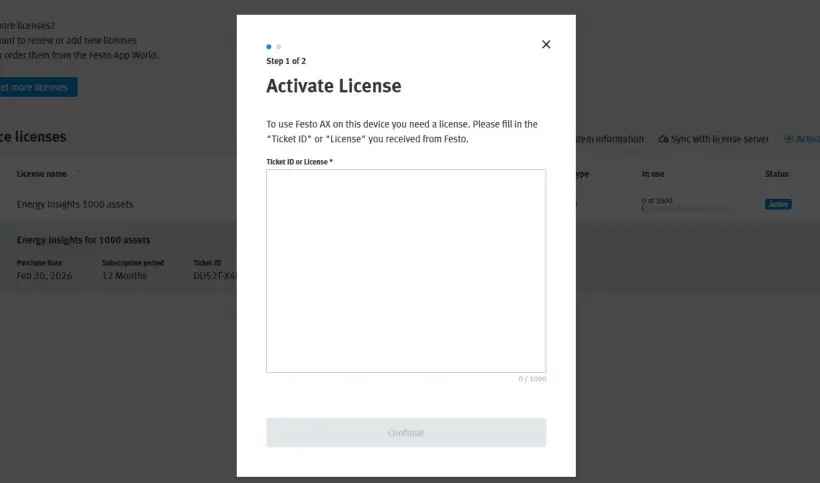
8. To activate another license, paste in the license key and proceed as shown above
How to Activate Your AX Smartenance License
Create AX Smartenance Account
1. Go to
2. Fill out all required registration fields
3. Accept captcha
4. Click on “Send”
5. Once you have registered, you will receive an email so you can finish setting up your account. If you haven’t received it, please check your spam filter.
6. Use your credentials to log in to
Activate Your AX Smartenance License
1. After login, you see the licenses view
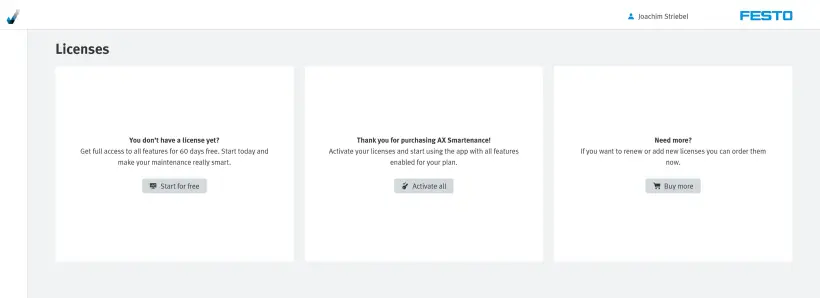
2. Select “Activate all” if you have already received a valid license key.
3. Insert license key you received from Festo
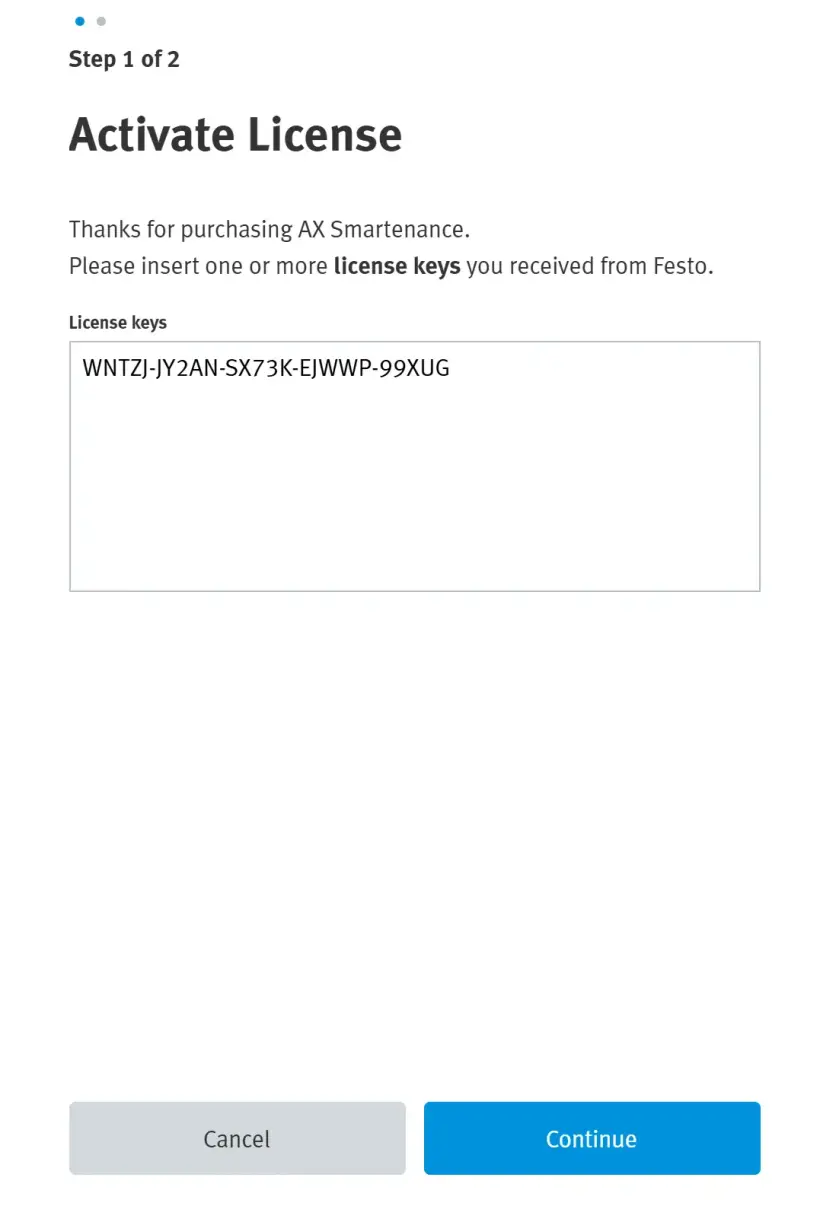
- Select “Continue”
- License key validation was successful
4. Select your licenses for activation
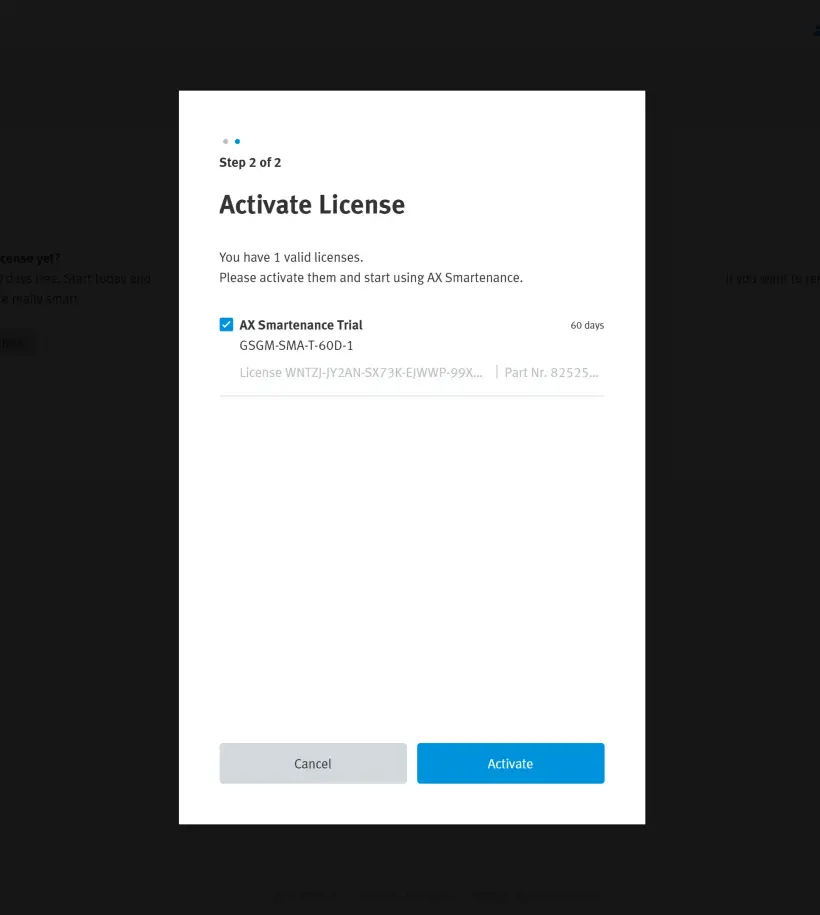
- Select “Activate”
- Activation was successful
5. You get an overview of all activated licenses
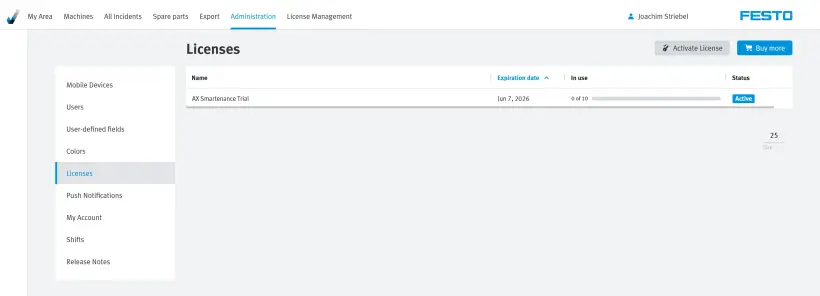
How to Activate Your Festo Energy Saving Services Portal License
After purchasing a license, you will receive an email with the license key (“Ticket ID”), which can be directly activated in the Energy Saving Services Portal
1. Go to
https://energysavingservices.festo.com/ and log in with your Festo account credentials. If you do not already have a Festo account, you can register by creating a new one.
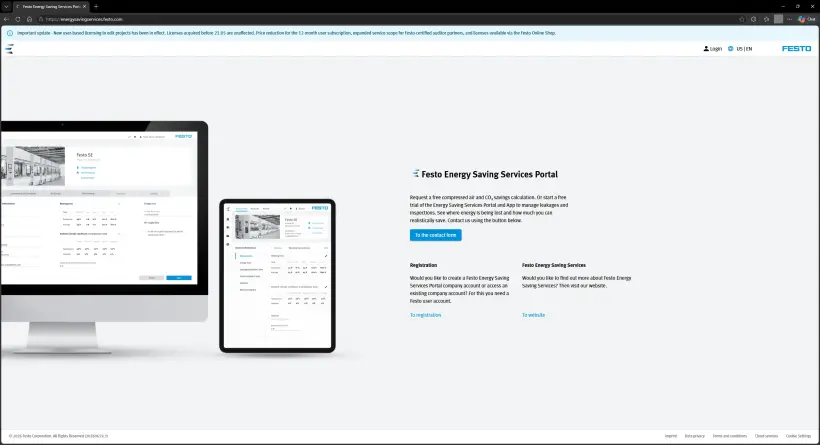
2. Go to the “Settings” and select the dropdown menu available at your name on the top of the site
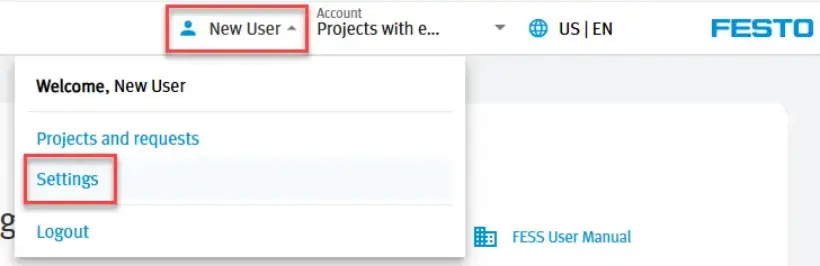
3. In “Account settings” select your account to open the settings site.
If you do not have an account yet, create one selecting the “+” icon.

4. In Account settings select “Licenses”
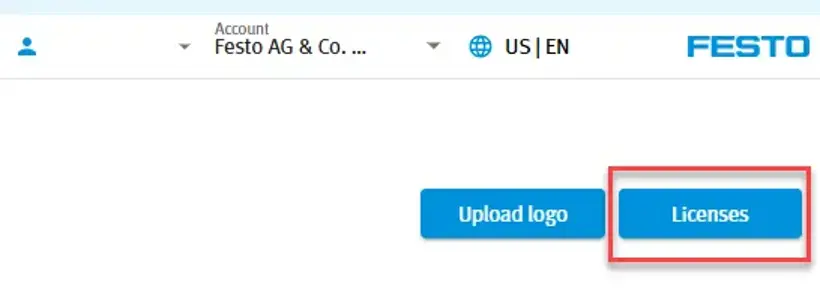
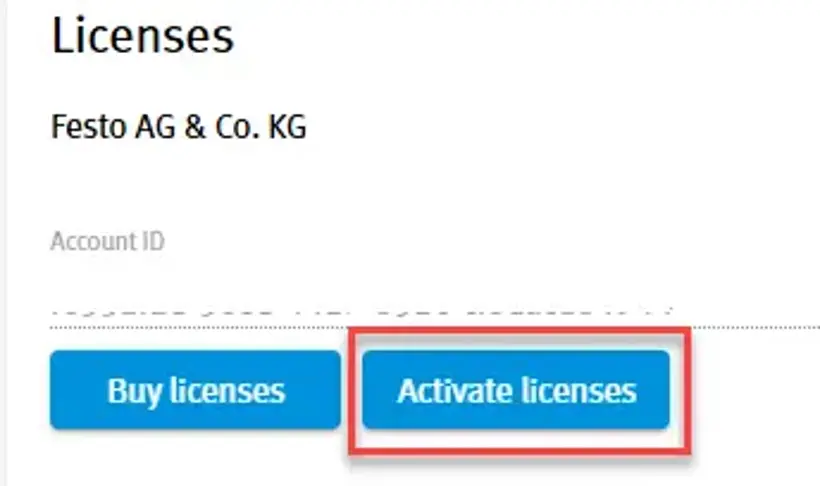
5. Then select “Activate licenses”
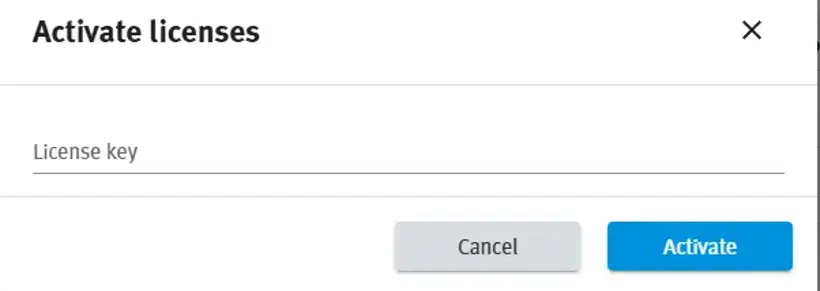
6. From the e-mail you receive, copy the license key and paste it in the “license key” field. Confirm by selecting “Activate”
7. To create a project, select “Service request,” select “+” and fill out the mandatory fields, select the desired service in accordance with the purchased license and select “Start project”
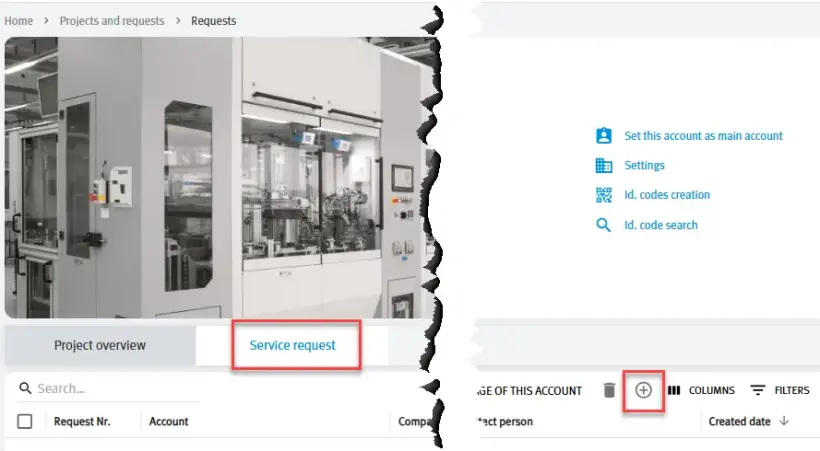
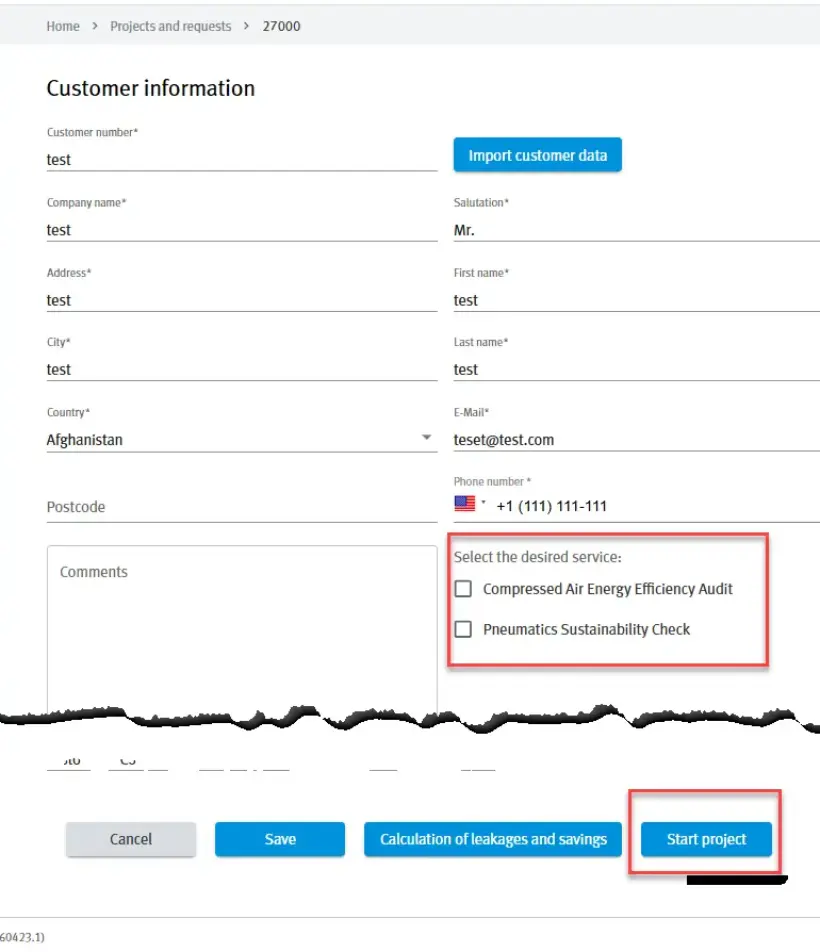
8. The “Select license to start project” window opens. Select the purchased license from the dropdown menu to create the project.
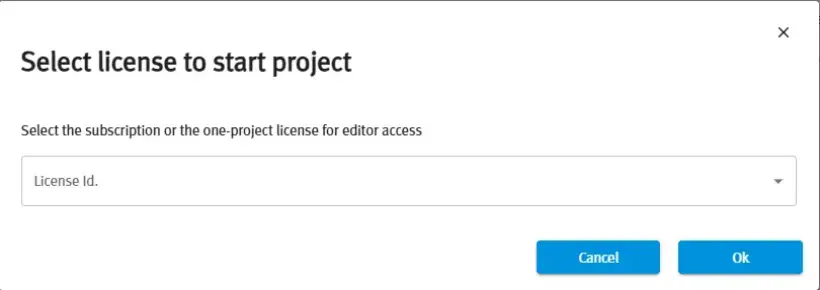
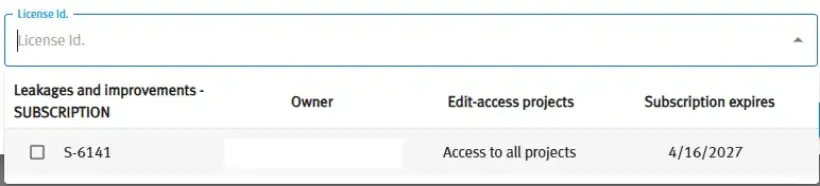
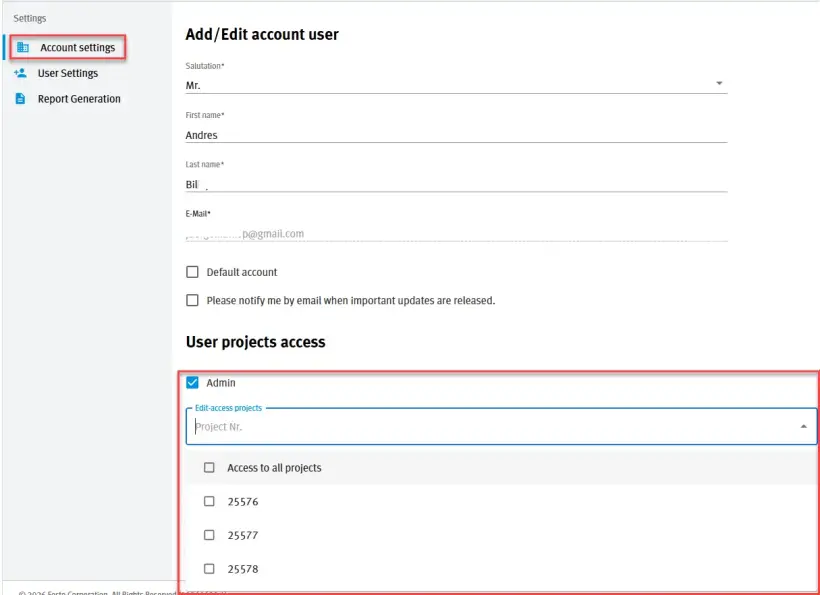
9. Manage the rights of the users (edit or read access to all projects or selected projects) in “settings” -> “account” -> “add/edit account user”
How to activate your Virtual Labs license
This guide takes you step-by-step through the initial setup to the first use of your Virtual Labs license.
1. Request a license key for the full version or demo version from Festo.
For the demo version, simply click the “Request demo” button on this page and follow the steps described there.
For the full version, please contact your Festo sales partner or click the “Contact” button on the right side of this page.
2. Redeeming the license key
Redeem the license key you received via email easily in our Learning Experience Portal Festo LX.
If you do not yet have an LX account, please follow the steps described under "How to activate your Festo LX license."
If you already have an LX account, you can skip this step.
Under “Activate Your Festo LX License,” you can enter any Festo Didactic license key in Festo LX, including the Virtual Labs license key.
Redeem it now.
Once you have successfully validated your license key in LX, it will appear in the overview.
Every member of your LX organization can now use Virtual Labs.
3. Download and start the Virtual Labs app
Now start your VR headset (Meta Quest 3) and download the "Virtual Labs" app by Festo Didactic from the Meta Horizon Store.

When starting the app, you will be prompted for login credentials. Follow the steps provided in the app and log in with your Festo LX account.
A license check and login verification will now be performed.
You are now ready to start your virtual training session.